Cylinder head — removal and installation
Warning: Wait until the engine is completely cool before beginning this procedure.
Removal
1. Relieve the fuel system pressure (see Fuel and exhaust systems), then disconnect the cable from the negative battery terminal (see Engine electrical systems).
2. Drain the cooling system (see Tune-up and routine maintenance).
3. Remove the drivebelt (see Tune-up and routine maintenance)and the drivebelt tensioner.
4. Remove the catalytic converter/exhaustmanifold (see Exhaust manifold — removal and installation).
5. Remove the intake manifold (see Intake manifold — removal and installation).
6. On 2015 and later CR-V models, removethe fuel rail, fuel injectors and the high-pressure fuel pump (see Fuel and exhaust systems).
7. Remove the timing chain (see Timing chain and sprockets — removal, inspection and installation), camshafts and rocker arm assembly (see Camshafts and rocker arms — removal, inspection and installation).
8. Label and disconnect the electrical connectors from the cylinder head that will interfere with removal. Use tape and mark each connector to insurecorrect reassembly. Also detach any coolant hoses that would interfere with removal.
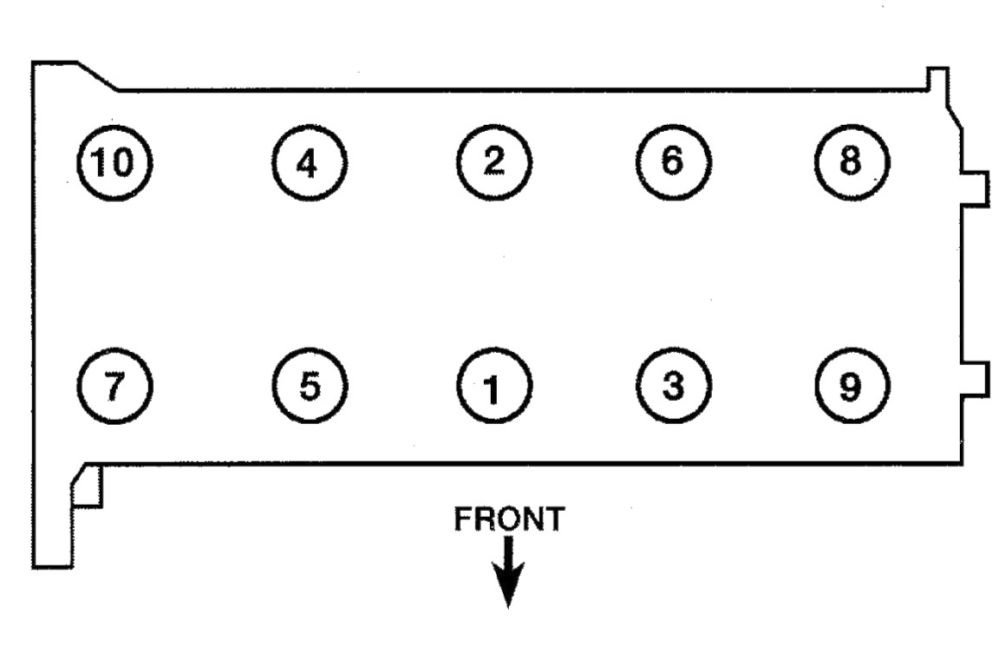
9. Remove the cylinder head bolts, following the reverse of the tightening sequence (see illustration 12.17). Loosen the bolts in sequence 1/4-turn at a time. Discard the bolts; new ones should be used upon installation.
10. Lift the cylinder head off the engine. If resistance is felt, place a wood block against the end and strike the wood block with a hammer. If the cylinder head is still stuck, carefully pry on a casting protrusion to break the gasket seal.
Caution: Do not pry between the cylinder head and block mating surfaces!
11. Store the cylinder head on wood blocks to prevent damage to the gasket sealing surfaces.
12. Remove the old cylinder head gasket.
Installation
13. The mating surfaces of the cylinder head and block must be perfectly clean when the head is installed. Use a gasket scraper to remove all traces of carbon and old gasket material, then clean the mating surfaces with brake system cleaner. If there’s oil on the mating surfaces when the cylinder head is installed, the gasket may not seal correctly and leaks may develop. When working on the engine block, cover the open areas of the engine with shop rags to keep debris out during repair and reassembly. Use a vacuum cleaner to remove any debris that falls into the cylinders.
14. Check the engine block and cylinder head mating surfaces for nicks, deep scratches and other damage. Have an automotive machine shop check the cylinder head for warpage.
15. Use a tap of the correct size to chase the threads in the cylinder head bolt holes. Dirt, corrosion, sealant and damaged threads will affect torque readings.
16. Make sure the new gasket is located on the dowels in the block.
17. Carefully position the cylinder head on the engine block without disturbing the gasket. Install new cylinder head bolts, and following the recommended sequence (see illustration), tighten the bolts to the torque listed in this Chapter’s Specifications.
i.17 Cylinder head bolt tighteningsequence
Note: The method used for the head bolt tightening procedure is referred to as «torque-angle» or «torque-to-yield» method. A special torque angle gauge (available at most auto parts stores) is available to attach to a breaker bar and socket for better accuracy during the tightening procedure.
18. Install the rocker arm assembly and camshafts (see Camshafts and rocker arms — removal, inspection and installation).
19. Install the timing chain (see Timing chain and sprockets — removal, inspection and installation).
20. Install the exhaust manifold (see Exhaust manifold — removal and installation).
21. Install the intake manifold (see Intake manifold — removal and installation).
22. The remaining installation steps are the reverse of removal.
23. Reconnect the battery (see Engine electrical systems).
24. Change the engine oil and filter and refill the cooling system (see Tune-up and routine maintenance), then start the engine and check carefully for oil and coolant leaks.