Cylinder head — removal and installation
Warning: Allow the engine to cool completely before beginning this procedure.
Removal
1. Relieve the fuel system pressure (see Fuel and exhaust systems), then disconnect the cable from the negative terminal of the battery (see Engine electrical systems).
2. Position the number one piston at TopDead Center (see Top Dead Center TDC) for number one piston — locating).
3. Drain the cooling system and remove thespark plugs (see Tune-up and routine maintenance).
4. Disconnect the heater hoses, the upperand lower radiator hoses and the bypass hose (see Cooling, heating and air conditioning systems).
5. Remove the air filter housing and intakeresonator (see Fuel and exhaust systems).
6. Remove the drivebelts (see Tune-up and routine maintenance).Unbolt the power steering pump and set it aside without disconnecting any hoses, then remove thepower steering pump bracket (see Suspension and steering).
7. Disconnect the accelerator cable andcruise control cable (if equipped) from the throttle body (see Fuel and exhaust systems).
8. Disconnect the EVAP canister hose, thebrake booster vacuum hose, the PCV hose and intake breather hose (Chapters 4 and 6).
9. Disconnect the injector harness, the ECT sensor, the TP sensor, the MAP sensor, oxygen sensor, EGR sensor, the CKP sensor, the CMP sensor,the VTEC solenoid (if equipped) and the IAC control valve connectors. Label each connector to prevent incorrect reassembly.
10. Remove the coolant connector hose from the coolant housing.
11. On models equipped with hydraulically assisted power steering, remove the power steering pump without disconnecting the hoses (see Suspension and steering).
12. Remove the alternator (see Engine electrical systems).
13. Remove the power steering bracket (if appliable) and the alternator bracket from the cylinder head.
14. Support the engine with a floor jack. Place a wood block between the jack pad and the oil pan to avoid damaging the pan. Remove the right engine mount bracket (see Engine mounts — check and replacement).
15. Remove the intake manifold brace, the intake manifold (see Intake manifold — removal and installation) and the exhaust manifold (see Exhaust manifold — removal and installation).
16. Remove the valve cover (see Valve cover — removal and installation).
17. Remove the timing chain (see Timing chain and sprockets — removal, inspection and installation) and the rocker arm assembly (see Rocker arm assembly — removal, inspection and installation).
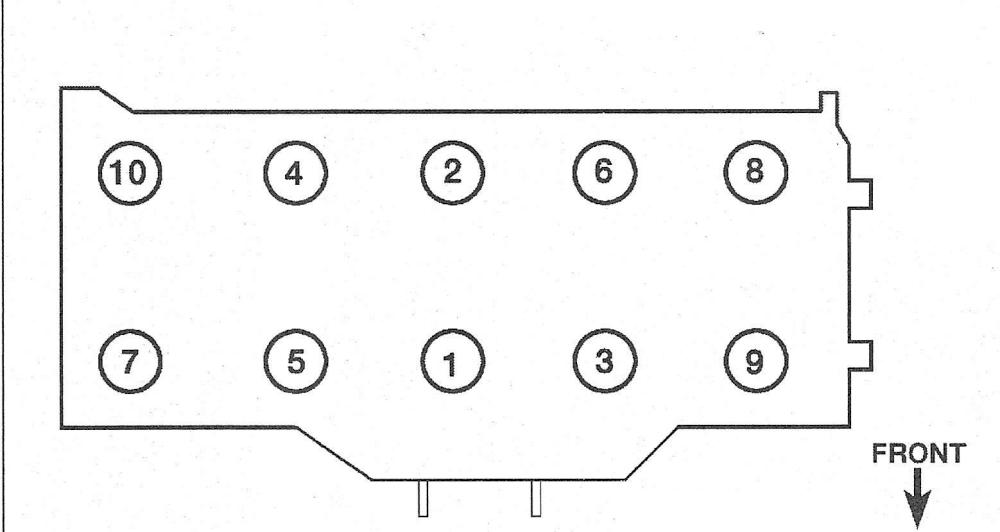
18. Loosen the cylinder head bolts in 1/4-turn increments until they can be removed by hand. Work in a pattern that’s the reverse of the tightening sequence to avoid warping the cylinder head (see illustration 26).
Caution: Discard the old bolts and obtain new ones (re-using the old bolts is not recommended, and, the final tightening stage assumes that new bolts are being installed).
19. Lift the cylinder head off the engine. If resistance is felt, don’t pry between the head and block gasket mating surfaces — damage to the mating surfaces will result. Instead, pry between a casting protrusion and the engine block. Set the head on blocks of wood to prevent damage to the gasket sealing surfaces.
20. Have an automotive machine shop check the cylinder head for warpage, and, if necessary, resurface it.
Installation
21. The mating surfaces of the cylinder head and block must be perfectly clean when the head is installed.
22. Use a gasket scraper to remove all traces of carbon and old gasket material, then clean the mating surfaces with brake system cleaner. If there’s oil on the mating surfaces when the cylinder head is installed, the gasket may not seal correctly and leaks may develop. When working on the engine block, stuff the cylinders with clean shop rags to keep out debris. Use a vacuum cleaner to remove material that falls into the cylinders. Since the cylinder head and engine block are made of aluminum, aggressive scraping can cause damage. Be extra careful not to nick or gouge the mating surfaces with the scraper.
23. Check the block and cylinder head mating surfaces for nicks, deep scratches and other damage. If damage is slight, it can be removed with a file; if it’s excessive, machining may be the only alternative.
24. Use a tap of the correct size to chase the threads in the cylinder head bolt holes. Use a wire brush to remove corrosion and clean the bolt threads. Dirt, corrosion, sealant and damaged threads will affect torque readings.
25. Place a new gasket on the engine block. Note: Always install a new coolant separator (the timing chain end of the engine) into the block if the block was replaced or the separator was damaged before installing a new head gasket. Check to see if there are any markings (such as «TOP») on the gasket to indicate how it is to be installed. Those identificationmarks must face up. Set the cylinder head in position.
26. Lubricate the threads and the seats of the NEW cylinder head bolts with clean engine oil, then install them. Tighten the bolts in the recommended sequence, in stages, to the torque listed in this Chapter’s Specifications (see illustration). Because of the critical function of cylinder head bolts, the manufacturer specifies the following conditions for tightening them:
- A beam-type or dial-type torque wrench is preferable to a pre-set (click-stop) torque wrench. If you use a pre-set torque wrench, tighten slowly and be careful not to overtighten the bolts.
- If a bolt makes any sound while you’re tightening it (squeaking, clicking, etc.), loosen it completely and tighten it again in the specified stages.
i.26 Cylinder head bolt TIGHTENING sequence
27. Install the timing chain (see Timing chain and sprockets — removal, inspection and installation) and rocker arm assembly (see Rocker arm assembly — removal, inspection and installation).
28. Rotate the crankshaft, clockwise, slowly by hand through two complete revolutions, then recheck the alignment marks on the sprockets.
Caution: If you feel any resistance while turning the engine over, stop and re-check the camshaft timing. The valves might be hitting the pistons.
29. Reinstall the remaining parts in the reverse order of removal.
30. Refill the cooling system and change the engine oil and filter (see Tune-up and routine maintenance).
31. Reconnect the battery (see Engine electrical systems).
32. Run the engine until normal operating temperature is reached. Check for leaks and proper operation.