Suspension and steering
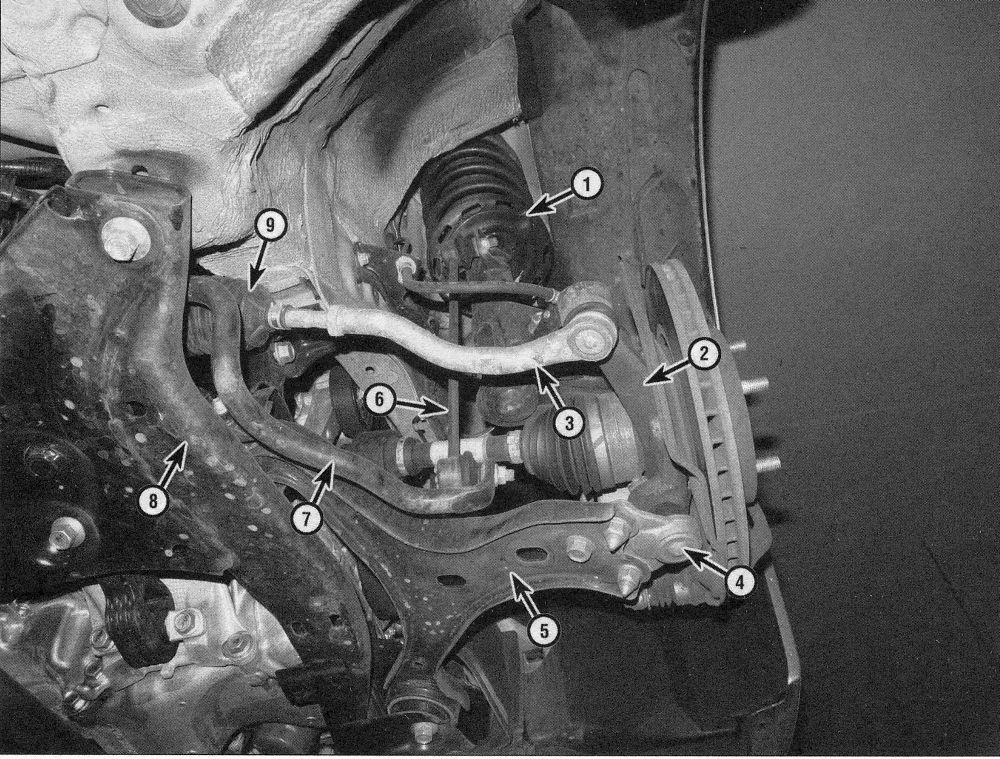
1. The front suspension is a MacPherson strut design. The upper end of each strut is attached to the vehicle’s body strut support. The lower end of the strut is connected to the upper end of the steering knuckle. The steering knuckle is attached by a ballpoint mounted to the outer end of the suspension control arm. A stabilizer bar connected to each control arm and mounted to the suspension crossmember reduces body roll during cornering (see illustrations).
1.1 Front suspension and steering components (Civic model shown)
1 Strut/coil spring assembly
2 Steering knuckles
3 Tie-rod ends
4 Abjoint
5 Control arms
6 Stabilizer bar links
7 Stabilizer bars
8 Subframe
9 Steering gear boots
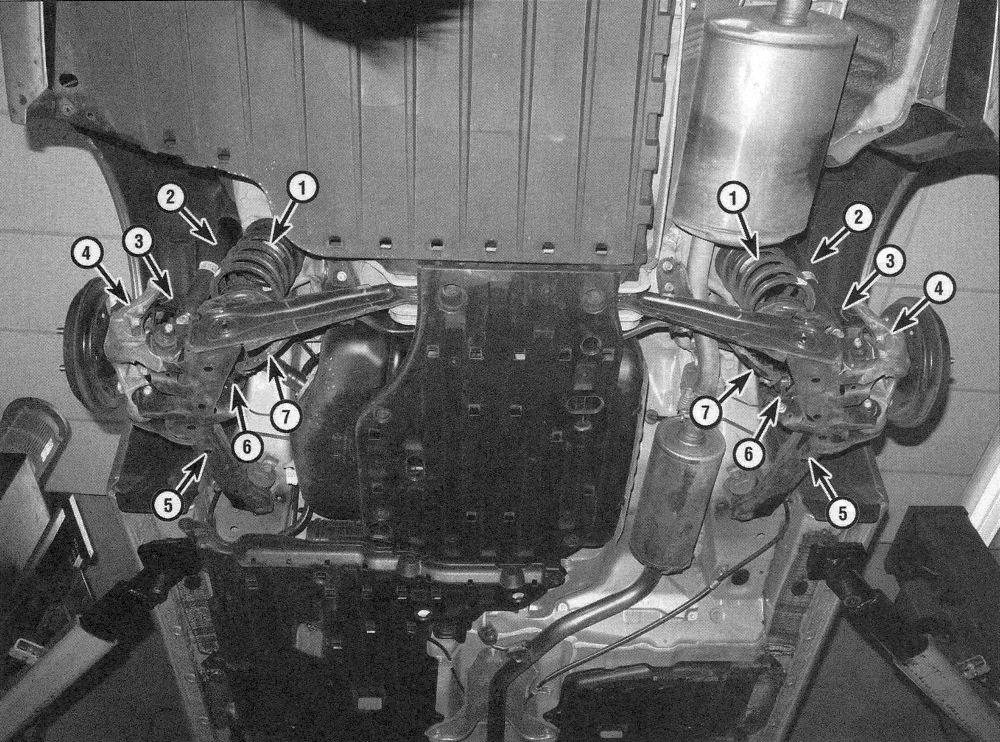
2. The rear suspension employs trailing arms, upper control arms and either shock absorber/coil spring assemblies (CR-V models) or shock absorbers with independent coil springs (Civic models) (see illustrations). The stabilizer bar is clamped to a suspension support and connected to the trailing arms by two links.
1.2 Rear suspension components (Civic models)
1 Coil spring
2 Shock absorbers
4 Rear knuckles
5 Trailing arms
6 Stabilizer bar links
7 Stabilizer bars
8 Upper control arm
3. The power-assisted rack-and-pinion steering gear is attached to the front suspension subframe. The assist comes from an electric motor mounted to the steering gear. The steering gear actuates the tie-rods, which are attached to the steering knuckles. The steering column is designed to collapse in the event of an accident.
4. Frequently, when working on the sus- pension or steering system components, you may come across fasteners that seem impossible to loosen. These fasteners on the underside of the vehicle are continually subjected to water, road grime, mud, etc., and can become rusted or frozen, making them extremely difficult to remove. In order to unscrew these stubborn fasteners without damaging them (or other components), be sure to use lots of penetrating oil and allow it to soak in for a while. Using a wire brush to clean exposed threads will also ease removal of the nut or bolt and prevent damage to the threads. Sometimes a sharp blow with a hammer and punch will break the bond between a nut and bolt threads, but care must be taken to prevent the punch from slipping off the fastener and ruining the threads. Heating the stuck fastener and surrounding area with a torch sometimes helps too, but isn’t recommended because of the obvious dangers associated with fire.
5. Long breaker bars and extension, or cheater, pipes will increase leverage, but never use an extension pipe on a ratchet — the ratcheting mechanism could be damaged. Sometimes tightening the nut or bolt first will help to break it loose. Fasteners that require drastic measures to remove should always be replaced with new ones.
6. Since most of the procedures dealt with in this Chapter involve jacking up the vehicle and working underneath it, a good pair of jack stands will be needed. A hydraulic floor jack is the preferred type of jack to lift the vehicle, and it can also be used to support certain components during various operations.
Warning: Never, under any circumstances, rely on a jack to support the vehicle while working on it. Whenever any of the suspension or steering fasteners are loosened or removed, they must be inspected and, if necessary, replaced with new ones of the same part number or of original equipment quality and design. Torque specifications must be followed for proper reassembly and component retention. Never attempt to heat or straighten any suspension or steering components. Instead, replace any bent or damaged part with a new one.