Strut assembly (front) — removal, inspection and installation
Removal
Note: If both strut assemblies are going to be removed, mark the assemblies Right and Left so they will be reinstalled on the correct side.
1. Loosen the wheel lug nuts, raise the vehicle and support it securely on jack stands. Remove the wheels.
2. Unbolt the brake hose bracket from the strut. If the vehicle is equipped with ABS, detach the speed sensor wiring harness from the strut by removing the clamp bracket bolt.
3. Remove the stabilizer bar link from the strut (see Stabilizer bar and bushings (front) — removal, inspection and installation).
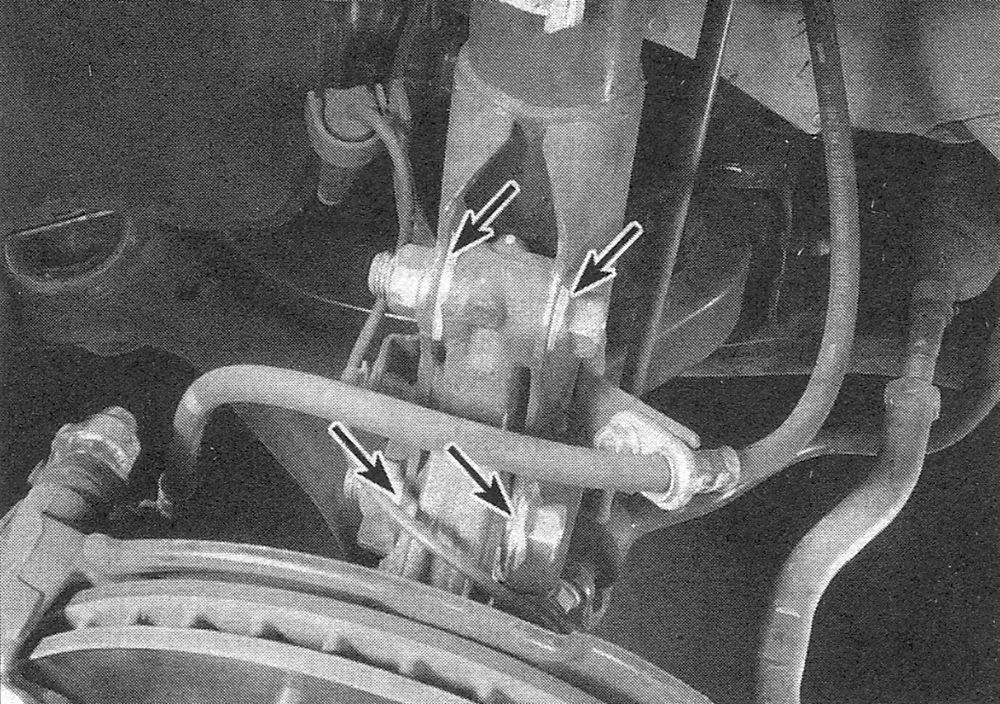
4. Mark the position of the strut to the steering knuckle, then remove the strut-to-knuckle nuts and bolts (see illustration).
i.4 Mark the position of the strut to the steering knuckle, around the bolt heads and where the strut meets the knuckle
Note: This is only necessary if special camber adjusting bolts have been installed in place of the regular strut-to-knuckle bolts. Remove the strut-to-knuckle nuts, then knock the bolts out with a hammer and punch.
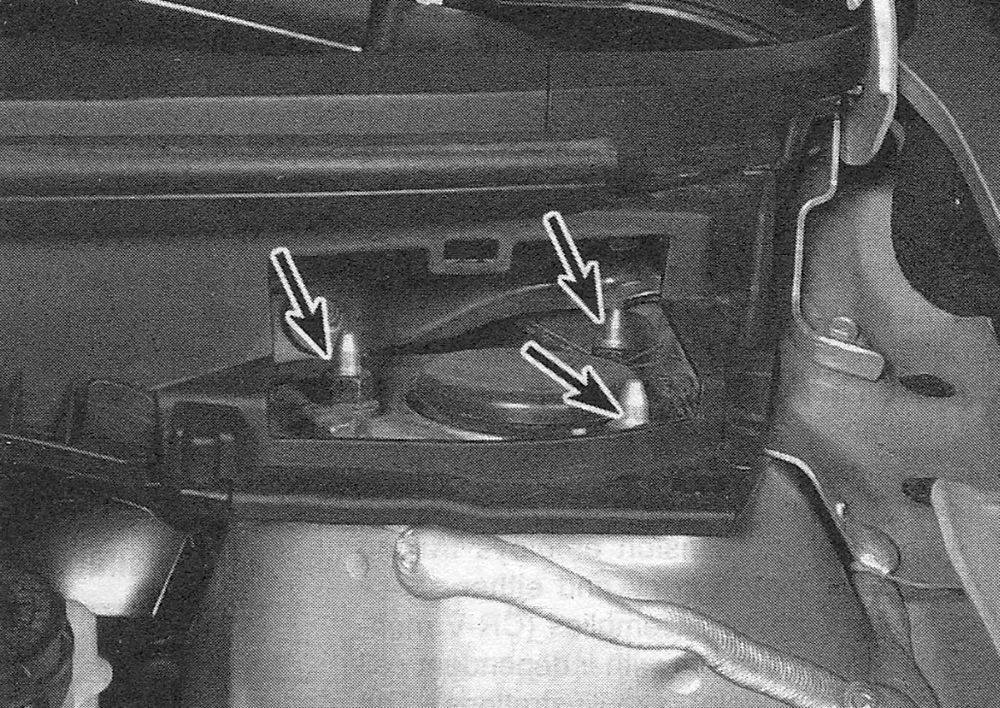
5. Remove the access cover from the cowl panel, then remove the three upper nuts securing the strut assembly to the body (see illustration).
i.5 Remove the access cover from the cowl panel to expose the upper strut mounting nuts. DO NOT remove the center nut (under the cover on top of the strut)
Note: Support the strut assembly while removing the last nut.
6. Separate the strut from the steering knuckle and remove it.
Caution: Be careful not to overextend the inner CV joint. Also, don’t let the steering knuckle fall outward and strain the brake hose.
7. Installation is the reverse of removal.
Inspection
8. Check the strut body for leaking fluid, dents, cracks and other obvious damage which would warrant repair or replacement.
9. Check the coil spring for chips or cracks in the spring coating (this will cause premature spring failure due to corrosion). Inspect the spring seat for cuts, hardness and general deterioration.
10. If any undesirable conditions exist, proceed to the strut disassembly procedure (see Strut/spring assembly — replacement).
Installation
11. Guide the strut assembly up into the fender well and insert the upper mounting studs through the holes in the body. Once the studs protrude, install the nuts so the strut won’t fall back through. This is most easily accomplished with the help of an assistant, as the strut is quite heavy and awkward.
12. Slide the steering knuckle into the strut flange and insert the two bolts. Install the nuts, align the previously made matchmarks and tighten them to the torque listed in this Chapter’s Specifications.
13. The remainder of installation is the reverse of removal. Tighten all fasteners to the torque values listed in this Chapter’s Specifications.
14. Install the wheel and lug nuts, then lower the vehicle and tighten the lug nuts to the torque listed in the Tune-up and routine maintenance Specifications.
15. Tighten the upper mounting nuts to the torque listed in this Chapter’s Specifications. Install the cowl panel cover.
16. Have the front-end alignment checked and, if necessary, adjusted.