Shock absorber/coil spring assembly (rear, CR-V models) — removal, component replacement and installation
Removal
1. Loosen the rear wheel lug nuts. Raise the rear of the vehicle and support it securely on jack stands. Block the front wheels to prevent the vehicle from rolling. Remove the wheel. Support the trailing arm with a floor jack (where it meets the knuckle).
2. Disconnect the stabilizer bar link from the trailing arm.
3. Unbolt the brake hose from the bracket on the trailing arm.
4. Unbolt the parking brake cable from the floor pan (near the trailing arm-to-floorplan mount).
5. Remove the bolts securing the front of the trailing arm to the floor pan.
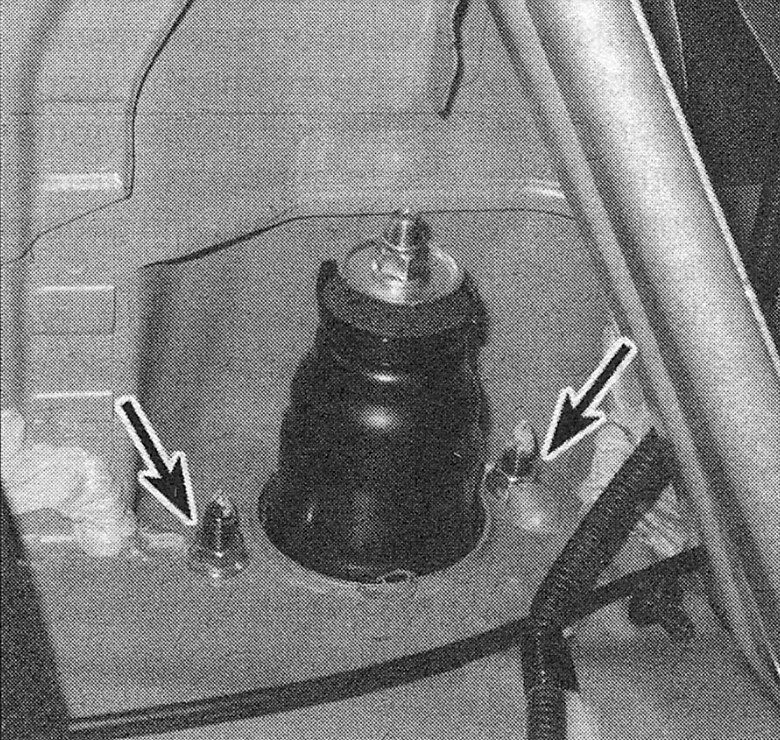
6. Fold down the rear seat back and remove the side trim panel (shock absorber access cover) from the cargo area. Remove the shock absorber upper mounting nuts (see illustration).
i.6 Remove the nuts from the shock absorber mounting studs — DON’T remove the nut in the center (2005 and earlier Civic and all CR-V models)
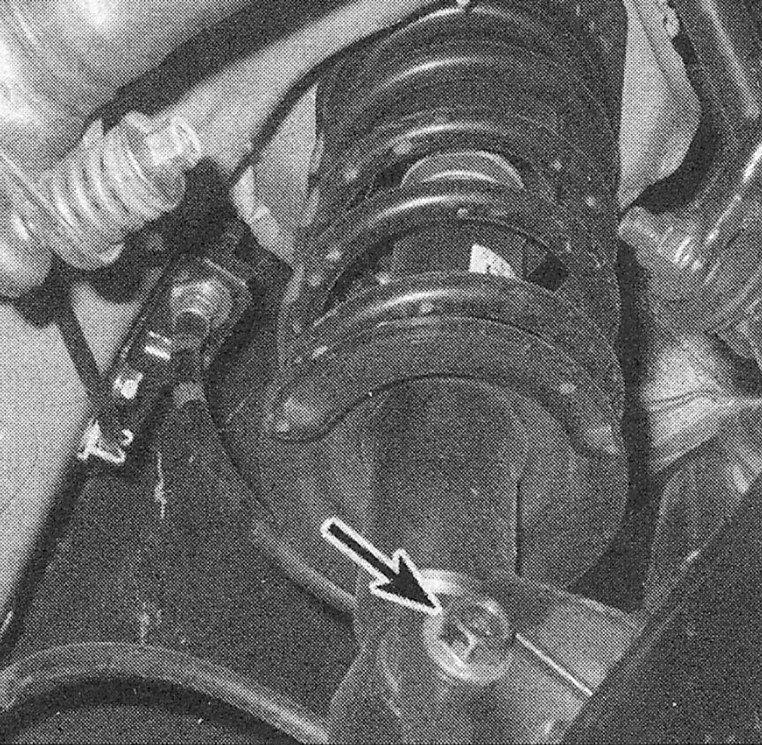
7. Remove the shock absorber lower mounting bolt (see illustration), then remove the shock absorber/coil spring assembly.
i.7 Rear shock absorber lower mounting bolt (2005 and earlier Civic and all CR -V models)
8. Check the shock body for leaking fluid, dents, cracks and other obvious damage which would warrant repair or replacement.
9. Check the coil spring for chips or cracks in the spring coating (this will cause premature spring failure due to corrosion). Inspect the spring seat for cuts, hardness and general deterioration.
10. If any undesirable conditions exist, proceed to the component replacement procedure.
Component replacement
Warning: Disassembling a shock/coil spring is potentially dangerous and utmost attention must be directed to the job, or serious injury may result. Use only a high-quality spring compressor and carefully follow the manufacturer’s instructions furnished with the tool. After removing the coil spring from the shock absorber, set it aside in a safe, isolated area. Note: If the shocks or coil springs exhibit the telltale signs of wear (leaking fluid, loss of damping capability, chipped, sagging or cracked coil springs), explore all options before beginning any work. The shock absorber/ coil spring assemblies are not serviceable and must be replaced if a problem develops. However, assemblies complete with springs may be available on an exchange basis, which eliminates much time and work. Whichever route you choose to take, check on the cost and availability of parts before disassembling your vehicle.
11. Mount the shock/coil spring assembly in a vise. Line the vise jaws with wood or rags to prevent damage to the unit and don’t tighten the vise excessively.
12. Following the tool manufacturer’s instructions, install the spring compressor (which can be obtained at most auto parts stores or equipment yards on a daily rental basis) on the spring and compress it sufficiently to relieve all pressure from the upper spring seat. This can be verified by wiggling the spring.
Note: Note the orientation of the upper mount in relation to the lower mounting eye (when reassembling the unit, the mount will have to be in the same position). Make a sketch or some matchmarks to help you get the mount positioned properly when reinstalling it.
13. Hold the shock damper rod with an Allen wrench, and unscrew the retaining nut with a box-end wrench.
14. Disassemble the parts from the damper, taking care to lay the parts out in the exact order in which they are removed.
Warning: When removing the compressed spring, lift it off carefully and set it in a safe place. Keep the ends of the spring away from your body.
15. Reassembly is the reverse of removal, noting the following points:
- ) Carefully place the spring onto the shock absorber body with the end of the spring resting in the lowest part of the seat.
- ) Use a new self-locking nut, then tighten the nut to the torque listed in this Chapter’s Specifications.
- ) Before releasing the spring compressor, make sure the upper mount is oriented as it was before removal in Step 8.
Installation
16. Guide the shock absorber/coil spring assembly up into the fender well and insert the upper mounting studs through the holes in the body. Once the studs protrude from the holes, install the nuts so the assembly won’t fall back through, but don’t tighten the nuts completely yet. The shock absorber is heavy and awkward, so get an assistant to help you, if possible.
17. Connect the shock to the trailing arm. Install the trailing arm-to-floor pan bolts and tighten them to the torque listed in this Chapter’s Specifications.
18. Raise the trailing arm with the floor jack to simulate normal ride height, Tighten the shock absorber lower mounting bolt to the torque listed in this Chapter’s Specifications.
19. The remainder of installation is the reverse of removal.
20. Install the wheel and lug nuts, lower the vehicle and tighten the lug nuts to the torque listed in the Tune-up and routine maintenance Specifications.
21. Tighten the upper mounting nuts to the torque listed in this Chapter’s Specifications.
22. Have the rear wheel alignment checked and, if necessary, adjusted.