Brake system check
Warning: The dust created by the brake system is harmful to your health. Never blow it out with compressed air and don’t inhale any of it. An approved filtering mask should be worn when working on the brakes. Do not, under any circumstances, use petroleum-based solvents to clean brake parts. Use brake system cleaner only!
Note: For detailed photographs of the brake system, refer to Chapter Brakes.
1. In addition to the specified intervals, the brakes should be inspected every time the wheels are removed or whenever a defect is suspected.
2. Any of the following symptoms could indicate a potential brake system defect: The vehicle pulls to one side when the brake pedal is depressed; the brakes make squealing or dragging noises when applied; brake pedal travel is excessive; the pedal pulsates; or brake fluid leaks, usually onto the inside of the tire or wheel.
Disc brakes
3. Disc brakes can be visually checked without removing any parts except the wheels. Remove the hub caps (if applicable) and loosen the wheel lug nuts a quarter turn each.
4. Raise the vehicle and place it securely on jack stands.
Warning: Never work under a vehicle that is supported only by a jack!
5. Remove the wheels. Now visible is the disc brake caliper which contains the pads. There is an outer brake pad and an inner pad. Both must be checked for wear.
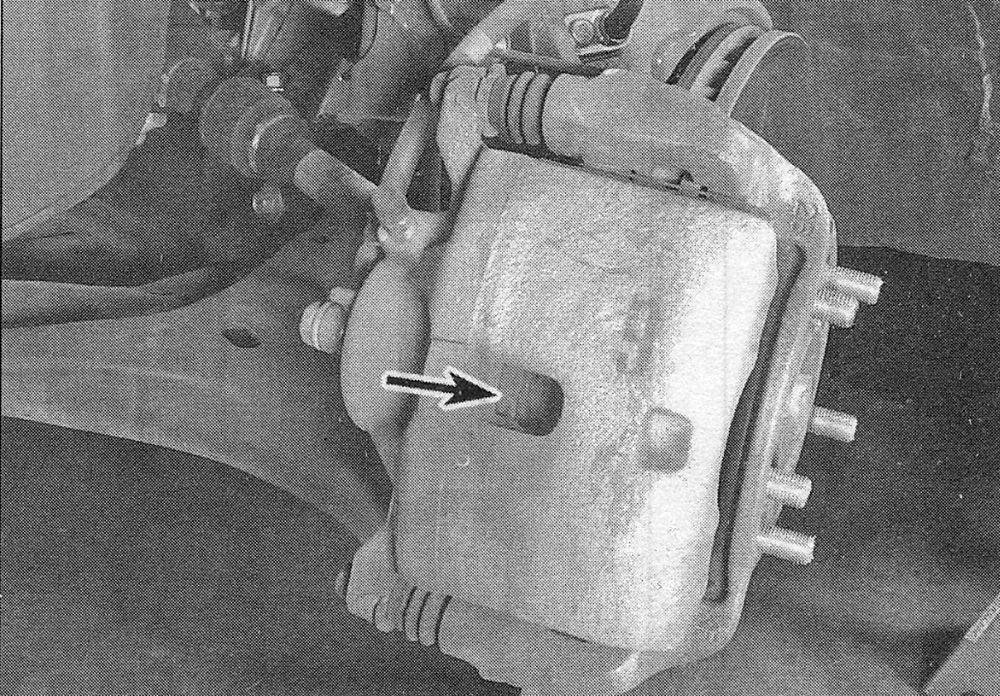
6. Measure the thickness of the outer pad at each end of the caliper and the inner pad through the inspection hole in the caliper body (see illustration). Compare the measurement with the limit given in this Chapter’s Specifications; if any brake pad thickness is less than specified, then all brake pads must be replaced (see Brakes).
i.6 You will find an inspection window in each caliper — the inner brake pad lining thickness can be determined by looking through this window
7. If you’re in doubt as to the exact pad thick- ness or quality, remove them for measurement and further inspection (see Brakes).
8. Check the disc for score marks, wear and burned spots. If any of these conditions exist, the disc should be removed for servicing or replacement (see Brakes).
9. Before installing the wheels, check all the brake lines and hoses for damage, wear, deformation, cracks, corrosion, leakage, bends and twists, particularly in the vicinity of the rubber hoses and calipers.
10. Install the wheels, lower the vehicle and tighten the wheel lug nuts to the torque given in this Chapter’s Specifications.
Drum brakes
11. Loosen the rear wheel lug nuts, then raise the vehicle and support it securely on jack stands. Make sure the parking brake is off, then tap on the outside of the drum with a rubber mallet to loosen it.
12. Remove the brake drums. If the drum still won’t come off, refer to Chapter Brakes
13. With the drums removed, carefully clean the brake assembly with brake system cleaner.
Warning: Don’t blow the dust out with compressed air and don’t inhale any of it (it is harmful to your health).
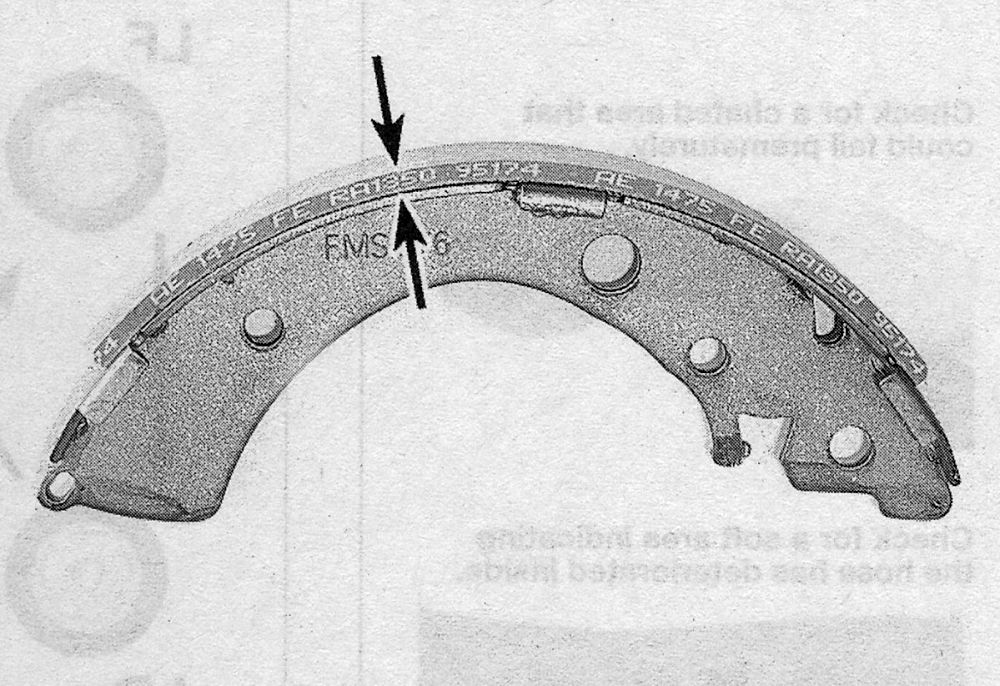
14. Note the thickness of the lining material on both front and rear brake shoes (see illustration). Compare the measurement with the limit given in this Chapter’s Specifications; if any lining thickness is less than specified, then all of the brake shoes must be replaced (see Brakes). The shoes should also be replaced if they’re cracked, glazed (shiny areas), or covered with brake fluid.
12.14 If the lining is bonded to the brake shoe, measure the lining thickness from the outer surface to the metal shoe; if the lining is riveted to the shoe, measure from the lining outer surface to the rivet head
15. Make sure all the brake assembly springs are connected and in good condition.
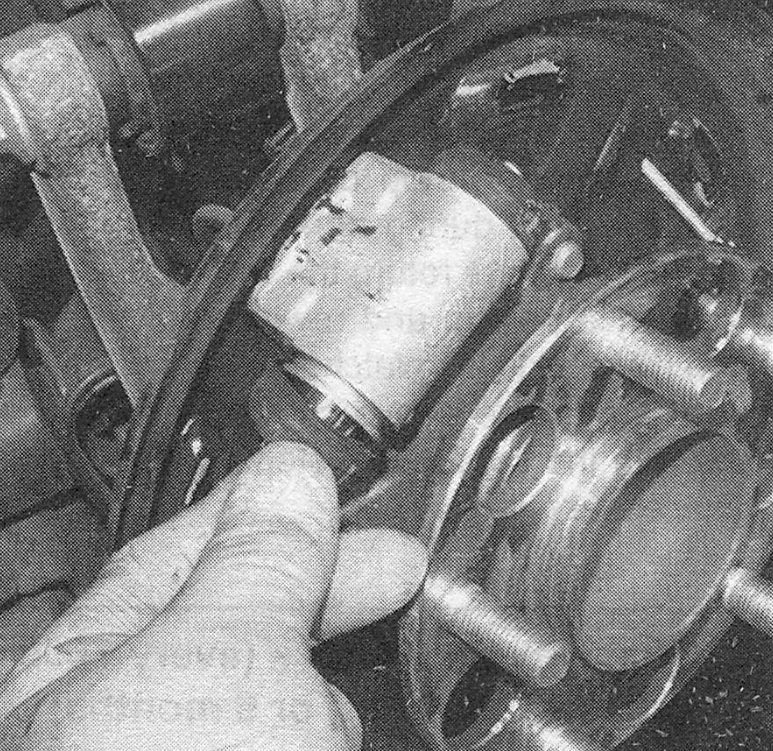
16. Check the brake components for signs of fluid leakage. With your finger or a small screwdriver, carefully pry back the rubber cups on the wheel cylinder located at the top of the brake shoes (see illustration). Any leakage here is an indication that the wheel cylinders should be replaced immediately (see Brakes). Also, check all hoses and connections for signs of leakage.
i.16 Carefully peel back the wheel cylinder boot and check for leaking fluid, indicating that the cylinder must be replaced
17. Wipe the inside of the drum with a clean rag and denatured alcohol or brake cleaner. Again, be careful not to breathe the dangerous brake dust.
18. Check the inside of the drum for cracks, score marks, deep scratches and hard spots which will appear as small discolored areas. If imperfections cannot be removed with fine emery cloth, the drum must be taken to an automotive machine shop for resurfacing.
19. Repeat the procedure for the remaining wheel. If the inspection reveals that all parts are in good condition, reinstall the brake drums, install the wheels and lower the vehicle to the ground.
Brake booster check
20. Sit in the driver’s seat and perform the following sequence of tests.
21. With the brake fully depressed, start the engine — the pedal should move down a little when the engine starts.
22. With the engine running, depress the brake pedal several times — the travel distance should not change.
23. Depress the brake, stop the engine and hold the pedal in for about 30 seconds — the pedal should neither sink nor rise.
24. Restart the engine, run it for about a minute and turn it off. Then firmly depress the brake several times — the pedal travel should decrease with each application.
25. If your brakes do not operate as described, the brake booster has failed. Refer to Chapter Brakes for the replacement procedure.
Parking brake
26. Slowly pull up on the parking brake and count the number of clicks you hear until the handle is up as far as it will go. The adjustment is correct if you hear the specified number of clicks (see this Chapter’s Specifications). If you hear more or fewer clicks, it’s time to adjust the parking brake (see Brakes).
27. An alternative method of checking the parking brake is to park the vehicle on a steep hill with the parking brake set and the transmission in Neutral. If the parking brake cannot prevent the vehicle from rolling, it is in need of adjustment (see Brakes).