Automatic transaxle and Continuously Variable Transaxle (CVT) — removal and installation
Warning: These models are equipped with a Supplemental Restraint System (SRS), more commonly known as airbags. Always disable the airbag system before working in the vicinity of any airbag system component to avoid the possibility of accidental deployment of the airbag(s), which could cause personal injury (see Chassis electrical system).
Warning: Do not use a memory saving device to preserve the PCM or radio memory when working on or near airbag system components
Note: Read through the entire Section before beginning this procedure. The engine and transaxle are removed as a unit from below, then separated outside the vehicle.
Removal
1. Set the steering wheel straight ahead and lock the steering wheel in that position. Set the steering column tilt and telescoping to the center positions.
2. Working under the driver’s side of the instrument panel, remove the steering column coupler cover at the base of the steering column.
3. Use a piece of wire and tie the upper and lower ends of the column shaft together at the U-joints. This is to prevent the lower part of the steering shaft from sliding out of the upper end after being disconnected from the rack and pinion.
4. Loosen the pinch bolt at the lower U-joint and disconnect from the rack and pinon splines.
5. Open the hood and cover the fenders and cowl using special pads. An old bedspread or blanket will also work. Remove the air intake duct and the air filter housing (see Fuel and exhaust systems).
6. On Civic models, remove the plastic fasteners and the upper cover above the grille.
7. On Civic models, remove the wiper arms, the wiper cowl and both ends (see Body). Remove the fasteners and the lower cowl panel from the vehicle.
8. On all models, remove the air intake duct and the air filter housing (see Air filter housing — removal and installation). Remove the air filter housing bolts and the bracket.
9. Remove the battery, battery tray and, if equipped, the battery bracket (see Engine electrical systems).
10. Remove the PCM and bracket from the engine compartment (see Powertrain Control Module (PCM) — removal and installation).
11. On CR-V and Civic CVT models, disconnect the shift cable from the transaxle (see Shift cable — replacement and adjustment).
12. Clearly label and disconnect all vacuum lines, emissions hoses, electrical connectors and wiring harness clamps/brackets that may interfere with transaxle removal. Masking tape and/or a touch up paint applicator work well for marking items. Take instant photos or sketch the locations of components and brackets.
13. Disconnect the automatic transaxle fluid cooler lines from the transaxle. Be sure to position a pan to catch excess fluid. Plug the lines to prevent leakage.
14. On 2015 and later CR-V models, unbolt the ATF warmer from the transaxle. Be prepared to catch any fluid that leaks. Replace the 0-rings. Remove the high-pressure fuel pump cover and the fuel pump bracket.
15. On all models, support the engine with an engine support fixture or an engine hoist (an engine support fixture is recommended, as it doesn’t have legs that extend under the vehicle that would get in the way). Connect the sling or chain to the lifting hook at the end of the engine near the transaxle, not to the lifting eye on the transaxle. If no lifting hook is provided, use the threaded hole(s) in the cylinder head to attach the sling or chain.
16. Remove the upper transaxle-to-engine bolts.
17. Disconnect the ground cable and remove the transaxle mount and bracket.
18. Loosen the front wheel lug nuts, then raise the vehicle and support it securely on jack stands. Remove the wheels.
19. Remove the engine splash shield (see Intake manifold — removal and installation) and the inner fender splash shields (see Cowl cover — removal and installation).
20. Drain the transaxle fluid (see Tune-up and routine maintenance). Be sure to use a new sealing washer when you reinstall the drain plug.
21. Remove the subframe (see Subframe — removal and installation).
22. On Civic and 2014 and earlier CR-V models, unbolt the ATF warmer from the transaxle. Be prepared to catch any fluid that leaks. Replace the 0-rings.
23. On all models, remove the torque converter cover.
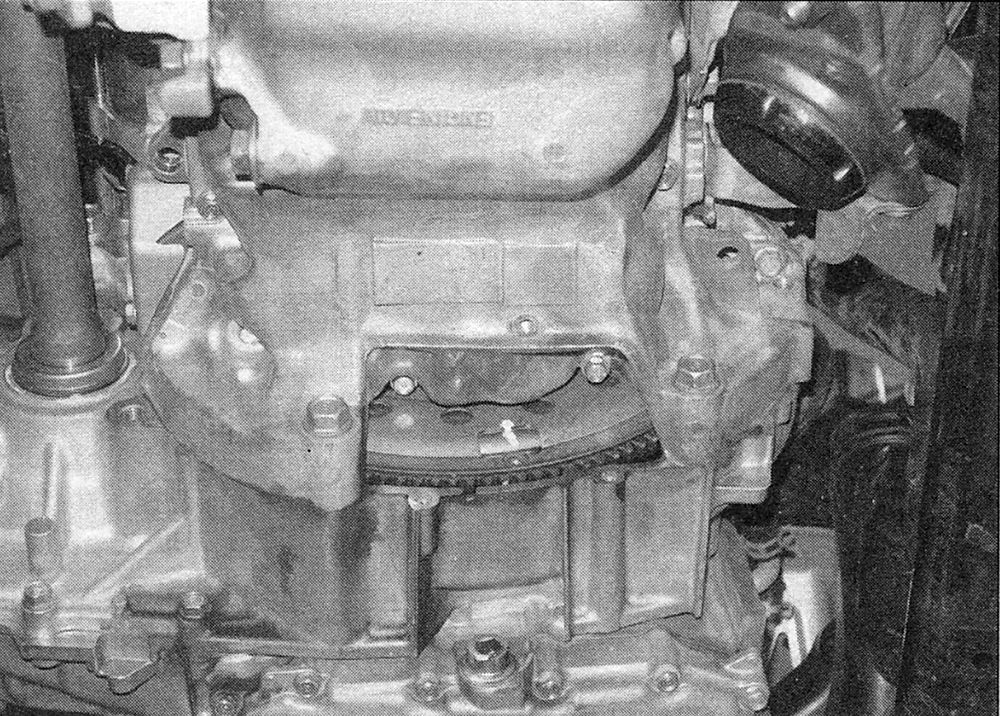
24. Mark the relationship of the torque converter (conventional transaxle) or the flywheel (CVT) to the drive plate so that they can be reinstalled in the same relationship to one another (see illustration).
i.24 Mark the relationship of the torque converter to the drive plate — Civic CVT model shown
25. Remove the torque converter to drive plate bolts one at a time by rotating the crankshaft pulley for access to each bolt.
26. Remove the drive axles, intermediate shaft and on AWD/4WD CR-V models, the driveshaft (see Clutch and driveline).
27. On CR-V models, remove the catalytic converter and pipe. If AWD/4WD, remove the transfer case (see Transfer case (4WD CR-V models) — removal and installation).
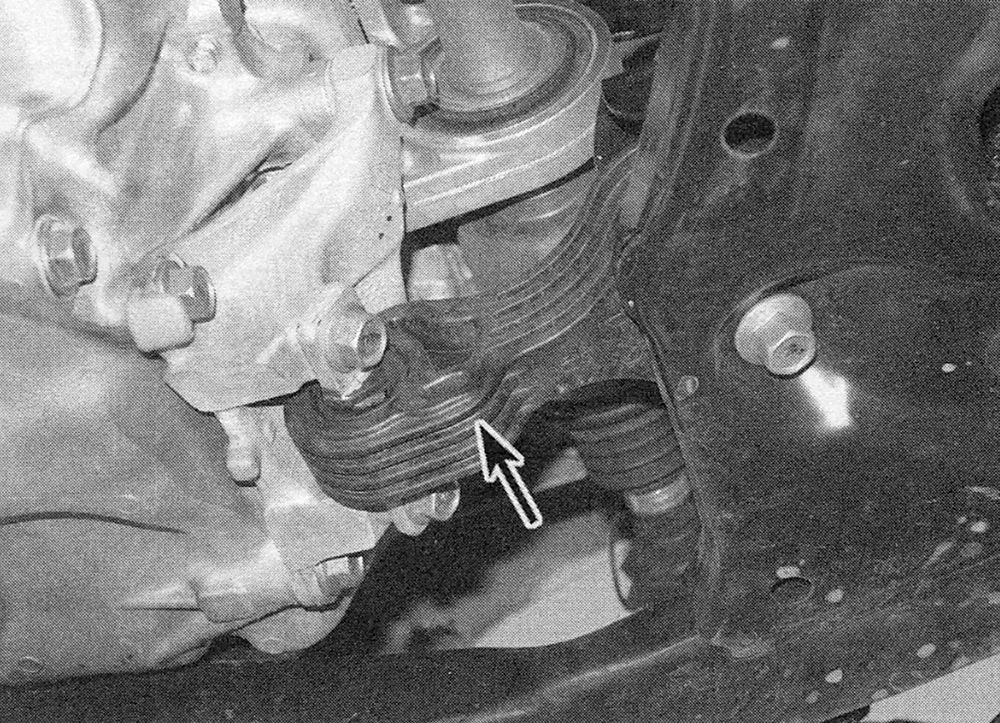
28. On all models, remove the engine torque rod and bracket (if equipped) (see illustration).
i.28 If equipped, remove the engine torque bracket (Civic CVT model shown)
29. On Civic non-CVT models, disconnect the shift cable from the transaxle (see Shift cable — replacement and adjustment).
30. On all models, support the transaxle with a jack, preferably one made for this purpose. Secure the transaxle to the jack with straps or chains.
31. Remove the remaining transaxle-to-engine bolts.
32. Move the transaxle back to disengage it from the engine block dowel pins and make sure the torque converter is detached from the drive plate. Secure the torque converter to the transaxle so it will not fall out during removal. Lower the transaxle from the vehicle.
Note: It may be necessary to slowly lower the engine a slight amount while the jack supporting the transaxle is being lowered. This will provide more clearance between the transaxle and the body.
Installation
33. Honda recommends flushing the transaxle cooler and the cooler hoses and lines with solvent whenever the transaxle is removed from the vehicle. Flush the lines and fluid cooler thoroughly and make sure no solvent remains in the lines or cooler after flushing. It’s a good idea to repeat the flushing procedure with clean automatic transaxle fluid to ensure that no solvent remains in the lines or cooler.
34. Prior to installation, make sure that the torque converter hub is securely engaged in the transaxle pump. With the transaxle secured to the jack, raise it into position. Be sure to keep it level so the torque converter does not slide out.
35. Line-up the marks you made on the torque converter and drive plate.
36. Make sure the dowel pins are still installed, then move the transaxle forward carefully until the dowel pins are engaged with the holes in the engine block.
37. Install the transaxle-to-engine bolts and tighten them to the torque listed in this Chapter’s Specifications.
Caution: Don’t use the bolts to force the transaxle and engine together. If the transaxle doesn’t slide easily up against the engine, find out why before you tighten the bolts.
38. The remainder of installation is the reverse of the removal procedure, noting the following points:
- ) Tighten subframe mounting bolts to the torque listed in the Suspension and steering Specifications.
- ) install all of the drive plate bolts before tightening any of them. Tighten the drive plate bolts to the torque listed in this Chapter’s Specifications.
- ) Tighten the drive axle/hub nuts to the torque listed in the Clutch and driveline Specifica
- ) Use new 0-rings on the ATF warmer.
- ) Tighten the wheel lug nuts to the torque listed in the Tune-up and routine maintenance Specifications.
- ) Refill the transaxle with the specified type and amount of lubricant (see Tune-up and routine maintenance). Note that the transaxle may require more fluid than in a normal fluid and filter change, since the torque converter may be empty (the converter is not drained during a fluid change).
- ) Start the engine, set the parking brake and shift the transaxle through all gears three times. Make sure the shift cable is adjusted properly (see Shift cable — replacement and adjustment).
- ) Allow the engine to reach its proper operating temperature with the transaxle in Park or Neutral, then turn it off and check the fluid level again.
Road test the vehicle and check for fluid leaks.