Bulb replacement
Civic
Exterior light bulbs
Front turn signal/side marker and parking light bulb (s)
1. If you’re changing a bulb on the left side, turn the wheels all the way to the right. If you’re replacing a bulb on the right side, turn the wheels all the way to the left.
2. Remove the front part of the left or right inner fender liner (see Body). On the two-door models, pull the intake duct tube out of the way (left side only).
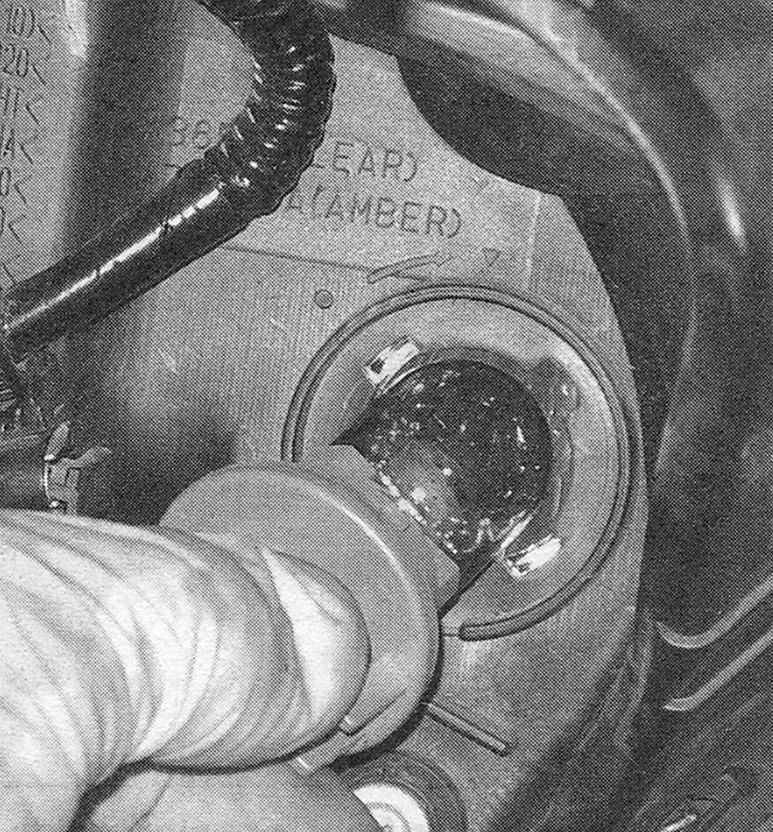
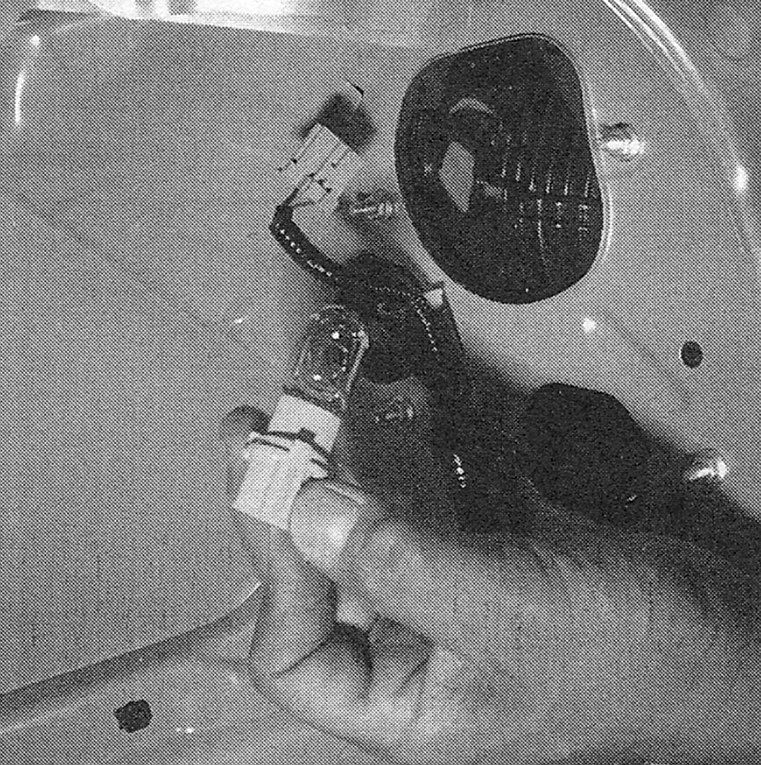
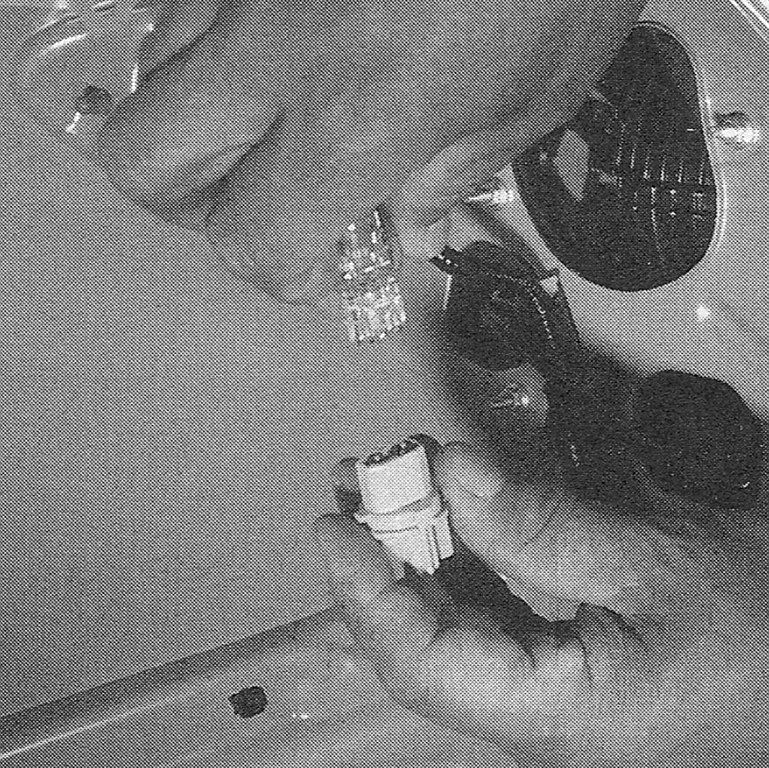
3. Locate the front turn signal bulb holder and the front parking light bulb holder (see illustration). Disconnect the electrical connector from the front turn signal bulb holder (see illustration) or from the front parking light bulb holder. To remove the bulb holder, turn it counterclockwise (see illustration) and pull it out of the housing.
i.3a After removing the front part of the inner fender liner, locate the electrical connector for the front turn signal light bulb and disconnect the
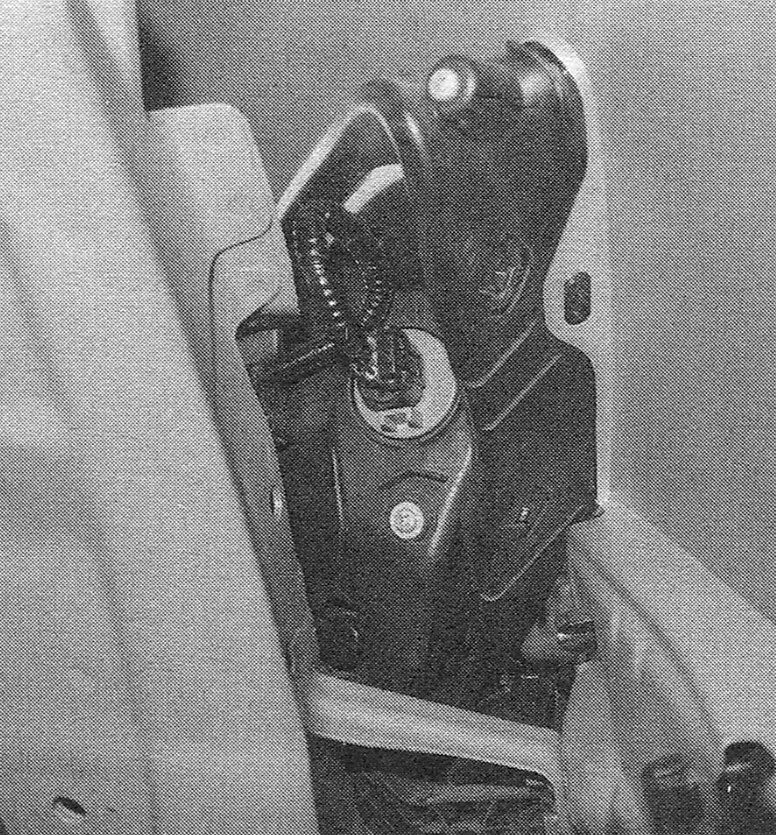
i.3b to remove the bulb holder from the headlight housing, turn it counterclockwise and pull it out of the housing
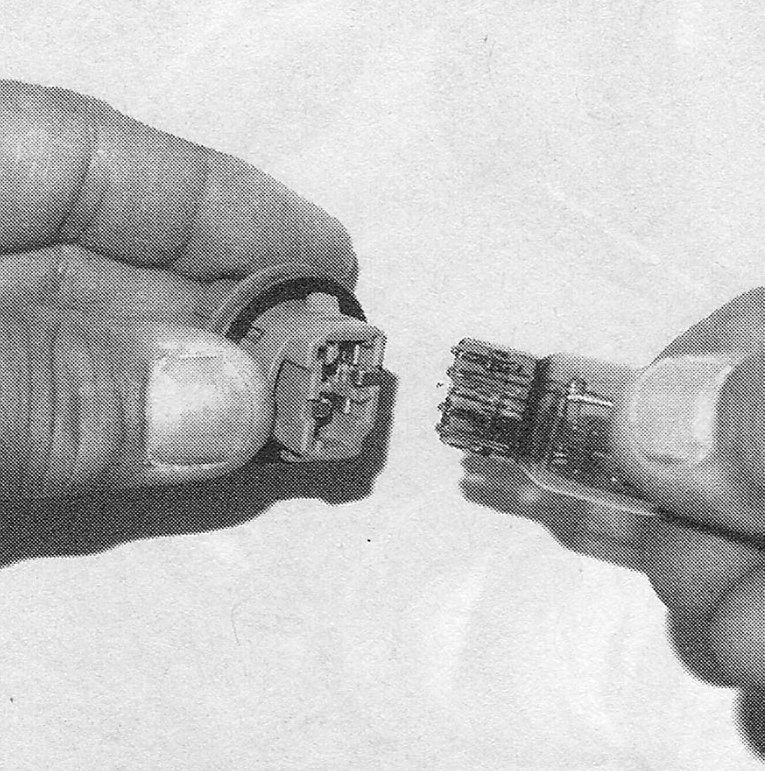
4. Remove the turn signal bulb from the bulb holder. Pull the bulb straight out of its holder (see illustration). To install a new bulb, push it straight into the bulb holder, then give it a clockwise turn to lock it into place in the holder.
i.4 To remove the front turn signal/side marker bulb or the front parking light bulb from its holder, grasp the holder firmly and pull the bulb straight out
5. Installation is the reverse of removal.
High-mount brake light with spoiler
6. Remove the two caps that cover the screws to the lens.
7. Unscrew the lens.
8. Remove the bulb connection, then remove the bulb.
9. Installation is the reverse of removal.
High-mounted brake light without spoiler
10. Open the trunk and look for the electrical connector for the high-mount brake light, which is located in the underside of the rear shelf area, just ahead of the trunk light (see illustration).
i.10 Disconnect the electrical connector from the high-mount brake light bulb holder, then turn the bulb holder counterclockwise to remove it from high-mount brake light housing

11. Disconnect the electrical connector from the bulb holder.
12. To remove the bulb holder from the high-mount brake light assembly, rotate the bulb holder counterclockwise and pull it out.
13. To remove the old bulb from the bulb holder, pull it straight out of the holder. To install a new bulb, push it straight into the bulb holder.
14. Installation is the reverse of removal.
License plate light
15. Open the trunk and locate the electrical connector for the license plate bulb you wish to replace.
16. To remove the bulb holder, depress the release tabs on the sides of the holder (see illustration .10) and pull it out. It’s not necessary to disconnect the electrical connector from the bulb holder in order to remove the holder.
17. To remove the bulb from the socket, pull it straight out.
18. To install a new bulb in the holder, push it straight into the holder.
19. Installation is the reverse of removal.
Taillight bulbs (in rear fender)
20. To access the outer taillight bulbs (in the vehicle’s rear fender) with trunk carpeting, detach and peel back the carpeting.
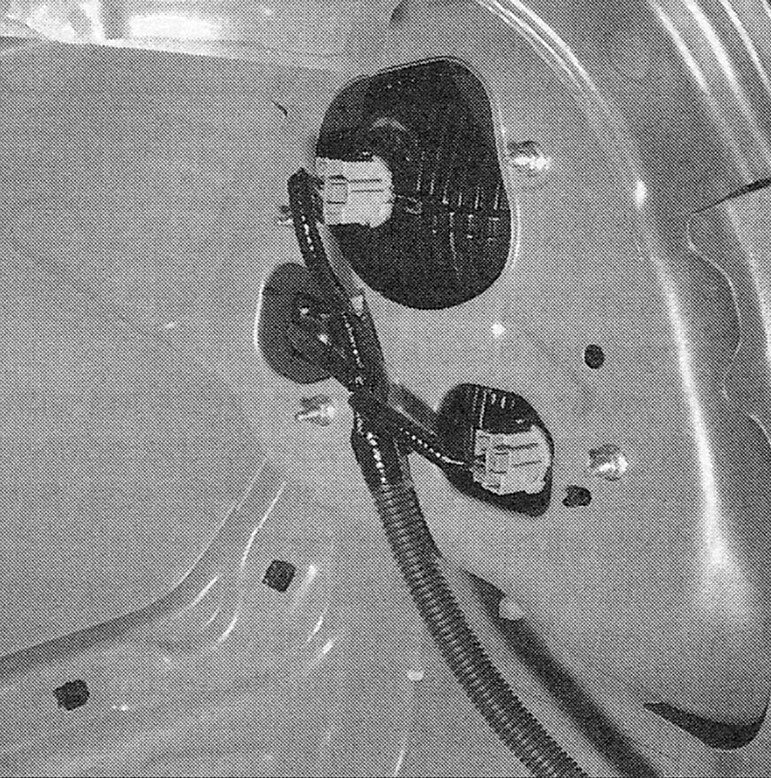
21. After peeling back the carpeting, you’ll see the bulb holders (see illustration). The upper bulb holder is for the brake/tail/rear side marker light bulb; the lower bulb holder is for the turn signal light bulb. To remove a bulb holder from an inner taillight, rotate the holder counterclockwise and pull it out.
i.21 Bulb locations
22. To remove a taillight bulb from its holder, pull it straight out (see illustrations).
i.22a Twist the bulb fixture to remove
i.22b Pull bulb straight out from the bulb fixture
23. To install a bulb in its socket, push it straight into the socket.
24. Installation is the reverse of removal.
Taillight bulbs (in trunk lid)
25. Open the trunk lid and locate the bulb holders for the taillight and back-up light bulbs (see illustration).
i.25 Rotate the bulb socket counterclockwise to remove

26. To remove either bulb holder, turn it counterclockwise and pull it out.
27. To remove either bulb from its bulb holder, pull it straight out of the holder.
28. To install either bulb in its bulb holder, push it straight into the holder.
Interior lights
Ceiling light (dome light)
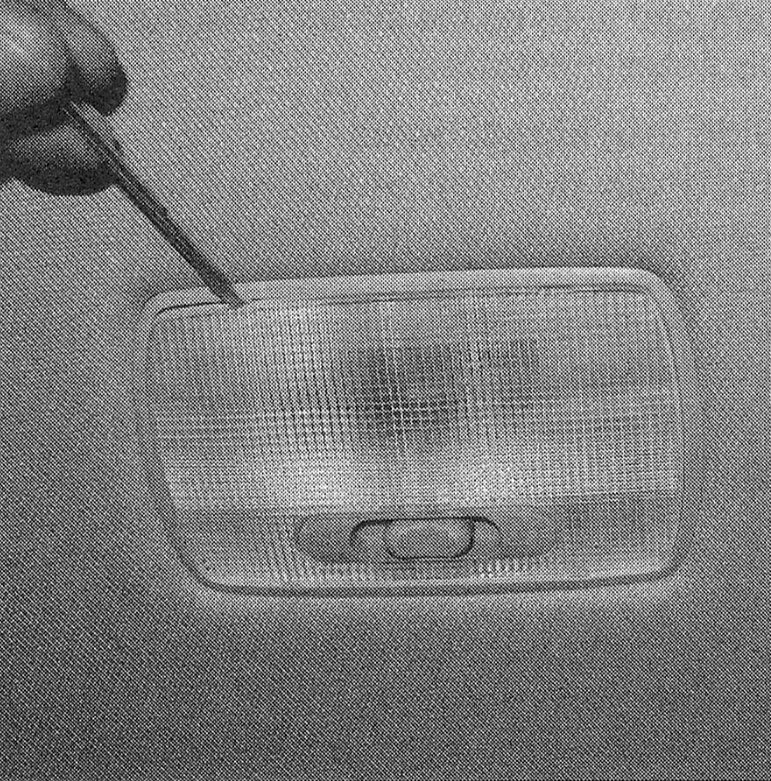
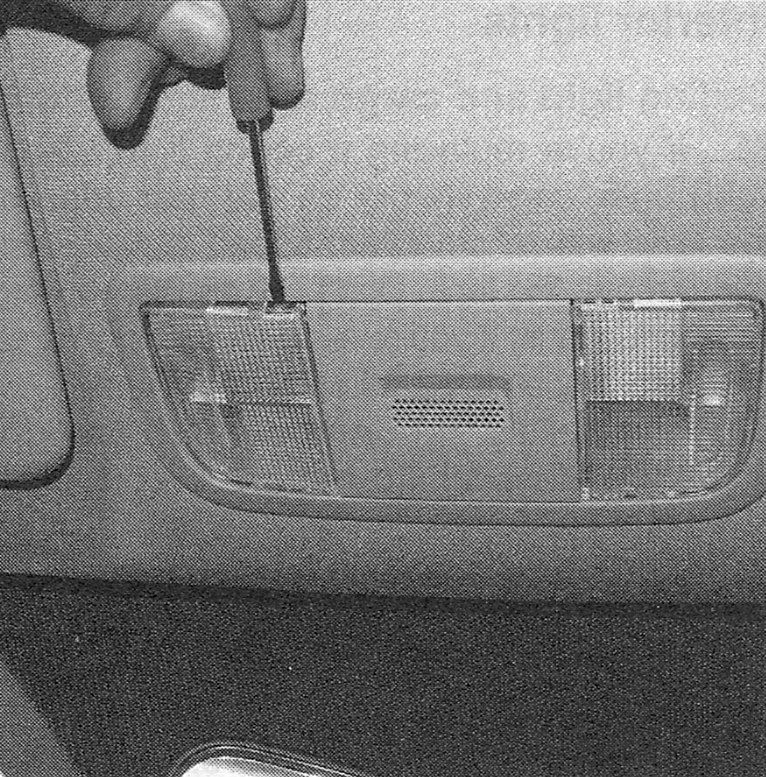
29. Using a small flat bladed screwdriver, pry off the lens (see illustration). Be careful not to damage the plastic trim around the edge of the lens.
i.29 To remove the lens from the ceiling light, pry it off with a small screwdriver. Be careful not to damage the plastic trim around the edge of the lens
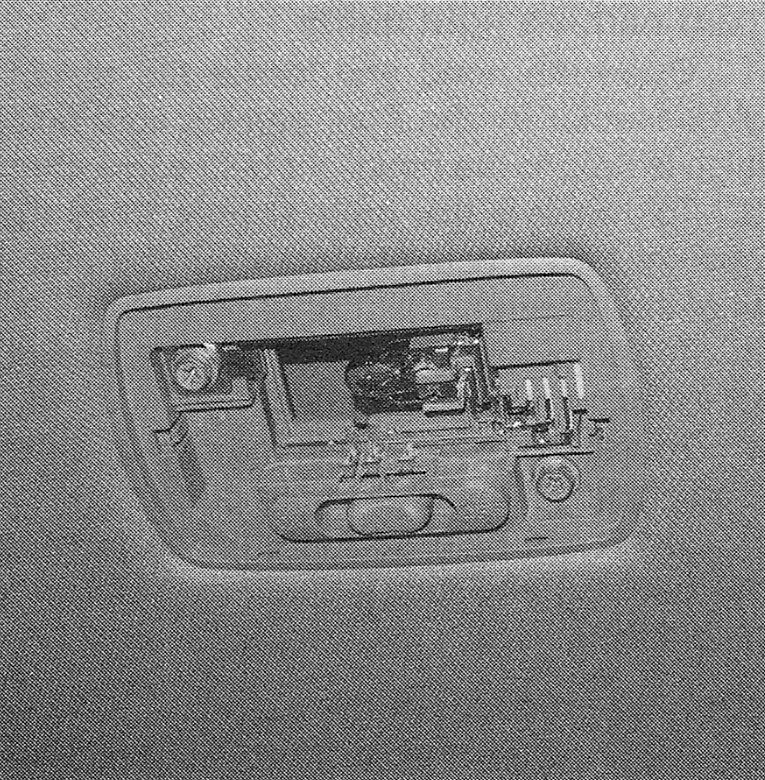
30. Remove the old bulb from the two metal clips (see illustration).
i.30 To remove the old bulb from the ceiling light, pull it straight out of the two metal clips
31. Install the new bulb. Make sure that it’s fully seated between the two metal clips.
32. Install the lens. Make sure that it snaps back into place.
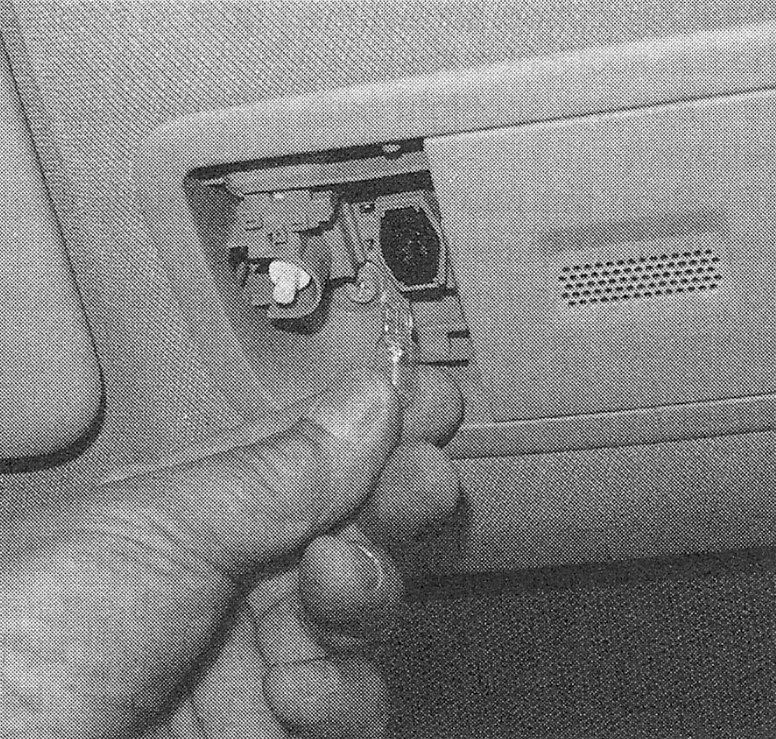
Note: To remove the actual fixture, remove the lens and then remove the retaining screws. Pull it down and disconnect the electrical connector. Installation is the reverse of removal.
Spotlight or ceiling light/spotlight
33. Carefully pry off the lens with a small flat bladed screwdriver (see illustration).
i.33 To remove the lens for the spotlight or the lens for the ceiling light/spotlight, carefully pry it loose with a small screwdriver
34. Remove the old bulb. On models without a sunroof, pull the bulb out from the two metal retaining clips (see illustration). On models with a sunroof, pull the bulb straight down from its receptacle.
i.34 To remove a bulb from a spotlight assembly , pull it out of the two metal clips
35. Install a new bulb. On models without a sunroof, make sure that the bulb is fully seated in the two metal clips. If the vehicle is equipped with a sunroof, insert the bulb into its receptacle and push it straight up until it stops.
36. Install the lens. Make sure that it snaps into place.
Hazard flasher switch light bulb
37. Remove the hazard flasher switch (see Instrument panel switches).
38. Unscrew and remove the light bulb from the hazard flasher switch.
39. Installation is the reverse of removal.
Trunk light bulb
40. Open the trunk. Remove the trunk light lens.
41. To remove the old bulb, pull it straight out.
42. To install a new bulb, push it straight in until it stops.
43. Install the trunk light lens. Make sure that it snaps into place.
CR-V models Exterior lights
Front side marker/turn signal light bulb
44. The electrical connector for the front side marker/turn signal light bulb is located near the headlight bulb connector. The procedure for replacing the bulb is similar to the procedure for Civic.
Front parking light bulbs
45. Remove the radiator cover.
46. The electrical connector for the front side marker/turn signal light bulb is located near the outer edge of the grille. The procedure for replacing the bulb is similar to the procedure for the Civic.
High-mount brake light bulb
47. Open the tailgate. To remove the high-mount brake light housing, push in on the tabs on the ends of the housing and pull off the housing.
48. To remove the bulb holder, turn it counterclockwise and pull it out.
49. To remove the bulb from the holder, pull it straight out.
50. To install the new bulb in the holder, push it straight in.
51. To install the housing, place it in position and push on it until it snaps into place.
License plate light bulb
52. License plate light removal is identical to the Civic. Follow the procedure for the Civic license plate bulb removal.
Taillight bulbs
53. Open the tailgate. Each of the two mounting screws for each taillight assembly is hidden by a trim cover. To remove the two trim covers, carefully pry off each of them with a small flat-tipped screwdriver. Put a piece of tape or a clean shop rag over the tip to protect the finish on the trim covers, then use the slot provided in each cover to pry it off.
54. Remove the two taillight assembly mounting screws and remove the taillight assembly.
55. There are four bulbs in the taillight assembly. They are, from top to bottom, the turn signal light bulb, the brake light bulb, the side marker/running light bulb and the back-up light bulb. To remove any of the bulb sockets, turn it counterclockwise and pull it out.
56. To remove a bulb from its socket, pull it straight out of the socket.
57. To install a new bulb in its socket, push it straight into the socket.
58. To install a bulb socket into the taillight assembly, insert the socket into its receptacle and give it a quarter-turn clockwise.
59. When installing the taillight assembly, make sure the locator pins on the taillight assembly are aligned with their respective holes in the pillar.
60. Installation is otherwise the reverse of removal.
Interior lights
Ceiling light and cargo area light bulbs
61 If you’re replacing a ceiling light (dome light) bulb, carefully pry on the rear edge of the lens with a small flat-tipped screwdriver and remove the lens. Don’t pry on the housing around the lens. If you’re replacing a cargo area
light bulb, pry on the front edge of the lens.
62. The ceiling light and cargo area light bulbs are identical. To remove an old bulb, pull it straight down.
63. To install a new bulb, push it straight up until it’s fully seated in the two metal tabs.
64. Install the lens. Make sure that it snaps into place.
Note: To remove the actual fixture, remove the lens and then remove the retaining screws. Pull it down and disconnect the electrical connector. Installation is the reverse of removal.
Spotlight bulbs
65. Pry on the front edge of the lens with a small flat-tipped screwdriver (just in front of the two spotlight bulbs).
66. Pull the spotlight bulb straight down to remove it.
67. Push the new spotlight bulb straight up until it’s fully seated.
68. Install the lens. Make sure that it snaps into place.
Hazard switch light bulb
69. Remove the hazard flasher switch (see Instrument panel switches).
70. Remove the illumination bulb from the hazard flasher switch. (Turn the bulb socket 90 degrees, then remove the bulb socket.)
71. Install a new illumination bulb in the switch.
72. Install the hazard flasher switch (see Instrument panel switches).
Glove box light bulb
73. Open the glovebox and locate the glove-box light in the upper front part of the glove-box ceiling.
74. Remove the bulb by pulling it straight out of the two metal mounting tabs.
75. To install the new bulb, push it into the two metal tabs until it’s fully seated.
Hatchback models Exterior lights
Front turn signal bulbs
76. Using a flat-tipped screwdriver, remove the holding clip from the inner fender cover (see Body if necessary).
77. Pull back the inner fender cover.
78. To remove the bulb socket from the headlight housing, turn it counterclockwise and pull it out.
79. To remove the old bulb from the socket, push it in and turn it counterclockwise until it unlocks, then pull it out.
80. To install the new bulb in the socket, push it in and turn it clockwise until it stops.
Front parking light bulbs
81. Open the hood and locate the electrical connector for the front parking light bulb, which is next to the headlight bulb connector.
82. To remove the bulb socket from the housing, turn it counterclockwise and pull it out of the housing.
83. To remove the old bulb from the socket, pull it straight out of the socket.
84. To install a new bulb in the socket, push it straight into the socket until it stops.
85. Insert the bulb socket into the parking light housing and turn it clockwise to lock it into place.
Front side marker bulbs
86. Push the front edge of the side marker lens toward the rear of the vehicle until the front edge of the lens pops out of the bumper cover.
87. To remove the bulb socket from the lens, turn the bulb socket counterclockwise and pull it out.
88. To remove the old bulb from the socket, pull it straight out of the socket.
89. To install a new bulb in the socket, push it straight into the socket until it stops.
90. Insert the bulb socket into the lens assembly and turn it clockwise until it stops.
91. Insert the tabbed end of the side marker assembly into the hole first, then the looped end, then press on the looped end until the assembly snaps into place.
High-mount brake light bulbs
92. Open the hatch. To remove the trim covering the high-mount brake light assembly, put your fingers between the trim and the hatch glass, then carefully pull down on the trim to unsnap the trim retaining clips from the hatch.
93. To remove the bulb holder from the high-mount brake light assembly, push the tabs on both sides and pull down the bulb holder.
94. To remove an old bulb from the holder, pull it straight out of the holder.
95. To install a new bulb in the holder, push it straight into the holder until it stops.
96. Push the bulb holder into the high-mount brake light assembly until it locks into place.
97. Align the clips on the trim with their corresponding holes in the hatch, then push the trim until the clips snap into place.
License plate light bulbs
98. To remove the license plate light assembly, slide the lens to the right until the left end pops out of the body, then pull out the license plate light assembly.
99. To remove the lens from the bulb socket, pull on the lens and squeeze the tabs on both sides of the socket at the same time.
10. 0. To remove the old bulb from the bulb socket, pull the bulb straight out of the socket.
10. 1. To install a new bulb in the socket, push it straight into the socket until it stops.
10. 2. To install the lens on the bulb socket, push it into place until it latches.
10. 3. To install the license plate light assembly, slide the right end of the assembly into the hole and push on the left end until the assembly snaps into place.
Side turn signal bulbs
10. 4. Push the front of the side turn signal assembly toward the rear of the vehicle until it pops out of the body.
10. 5. To remove the bulb socket from the lens, turn the socket counterclockwise.
10. 6. To remove the old bulb from the bulb socket, pull it straight out.
10. 7. To install a new bulb in the socket, push it straight into the socket until it stops.
10. 8. To install the bulb socket into the lens, insert it into the hole in the lens and turn it clockwise until it stops.
10. 9. To install the side turn signal assembly in the body, insert it into the hole rear end first, then push on the front end until it snaps into place.
Taillight bulbs
11. 0. Open the hatch. Locate the trim cover in the corner of the cargo area. To remove the trim cover, carefully pry on the upper front edge with a small flat-tipped screwdriver.
11. 1. You’ll see three bulb sockets. The upper socket is for the turn signal light bulb, the middle socket is for the back-up light bulb and the lower one is for the brake light/taillight bulb. All three sockets are removed the same way.
11. 2. To remove a bulb socket, turn it counterclockwise and pull it out.
11. 3. To remove an old bulb from its socket, push it in and turn it counterclockwise until it unlocks.
11. 4. To install a new bulb into a socket, push it in and turn it clockwise until it stops.
11. 5. Insert the bulb socket into the taillight assembly and turn it clockwise until it locks into place.
11. 6. Install the trim cover.
Interior lights
Front ceiling light/spotlight bulbs
11. 7. To remove the lens for the front ceiling light/spotlight, pry on the middle of the front edge of the lens.
11. 8. To remove one of the old bulbs, pull it straight down.
11. 9. To install a new bulb, push it straight up until it stops.
12. 0. To install the lens, place the side with the tabs in position, then push the other side into place until it snaps into position.
Note: To remove the actual fixture, remove the lens and then remove the retaining screws. Pull it down and disconnect the electrical connector. Installation is the reverse of removal.
Center ceiling light bulb
12. 1. To remove the lens for the center ceiling light, pry on the middle of the side edge of the lens.
12. 2. To remove the old bulb, pull it straight down from the two metal tabs.
12. 3. To install a new bulb, insert it into the metal tabs until it snaps into place.
12. 4. To install the lens, place the edge with
the tabs in position, then push the other edge into place until it snaps into position.
Note: To remove the actual fixture, remove the lens and then remove the retaining screws. Pull it down and disconnect the electrical connector. Installation is the reverse of removal.
Cargo area light bulb
12. 5. Open the hatch. To remove the lens for the cargo area light, carefully pry on the front edge of the lens with a small screwdriver. Put a shop towel or a piece of tape on the tip of the screwdriver to protect the trim.
12. 6. To remove the old bulb pull it straight out of the bulb holder.
12. 7. To install a new bulb, push it straight into the holder until it’s fully seated.
12. 8. To install the lens, insert it into the mounting hole rear side first, then push on the front side until it snaps into place.
Note: To remove the actual fixture, remove the lens and then remove the retaining screws. Pull it down and disconnect the electrical connector. Installation is the reverse of removal.