Variable Valve Timing and Lift Electronic Control (VTEC) system — description and component replacement
Description
1. A low-lift, short-duration camshaft intake lobe produces good torque, quick response, good fuel economy and low emissions at lower engine speeds, but can’t deliver sufficient air/fuel mixture to the combustion chamber at higher engine speeds. A high-lift, long-duration intake cam lobe produces good power at high engine speeds, but produces a lumpy idle and poor drive ability, wastes fuel and produces unacceptable emissions at lower engine speeds. That’s why camshaft intake lobe profiles are always a compromise between economy and performance. But Honda’s Variable valve Timing and lift Electronic Control (VTEC) system allows an engine to operate economically and make good power at the same time.
2. The VTEC system is used on all engines. The principal differences between VTEC and non-VTEC engines are in the cylinder head, the camshaft (s) and the rocker arms. The block, the lubrication and cooling systems and most other components are identical on VTEC and non-VTEC engines. For more information about the cylinder head, the camshaft(s) and the rocker arms, refer to Chapter 1.8L single overhead camshaft (SOHC) engine. This Section is intended to familiarize you with how VTEC works and to show you how to replace the PCM-controlled components (the VTEC solenoid valve and the VTC oil control solenoid valve) in the VTEC system. If you don’t know whether your vehicle is equipped with VTEC, look for the letters «VTEC» on top of the valve cover.
VTEC system on SOHC models (coupes and sedans)
3. On 1.8L SOHC engines, there are five camshaft lobes, three for the intake rocker arm and two for the exhaust rocker arms. These «primary» and «secondary» lobe profiles differ in lift and duration: the secondary lobe has lower lift and less duration (it opens later and closes sooner), while the primary lobe has higher lift and more duration (opens sooner and closes later). Each lobe operates its own rocker arm, which in turn pushes on its own valve. At low speeds, the secondary camshaft lobe operates one intake valve and the primary cam lobe operates the other valve. The low-lift, short-duration lobe produces good low-end torque and responsiveness.
4. When more power is needed at higher engine speeds, the PCM activates the VTEC solenoid valve, which allows higher oil pressure to a hydraulically-operated, spring-loaded pin inside the primary rocker arm.
Note: The VTEC solenoid is called the rocker arm oil control valve. When hydraulic pressure overcomes spring pressure, the pin slides sideways and locks the secondary rocker arm to the primary rocker arm. The two rocker arms are both activated by the primary cam lobe; the secondary rocker arm no longer contacts its own camshaft lobe again until the system is disengaged. So, both valves are now opened by the primary camshaft lobe with its higher lift and longer duration, increasing performance.
5. The PCM turns the VTEC solenoid on and off in accordance with engine rpm, vehicle speed, throttle opening angle, engine load and coolant temperature. Although diagnosis of the VTEC system is beyond the scope of the home mechanic, it’s not difficult to replace the VTEC solenoid valve or to clean the filter for the system, both of which are outlined below.
Intelligent Variable Valve Timing and Lift Electronic Control (i-VTEC) system on DOHC models (CR-V and Civic 2.4L engines)
6. The «intelligent» VTEC (i-VTEC) systemused on the DOHC engines in these two models is similar in operation to the SOHC VTEC system, except that they also employ Variable Valve Timing Control (VTC).
Variable Valve Timing Control (VTC)
7. The VTEC system changes the valve lift and duration of the intake camshaft by using two different cam profiles. The VTC system, which is employed only on i-VTEC systems, changes the phase of the intake camshaft, which is another way of saying that it changes the cam timing, except that it does so continuously, not just when engine speed exceeds a certain threshold, as with the VTEC system. The VTC system, which is also operated by hydraulic (oil) pressure, improves fuel efficiency even more than VTEC alone, and it reduces exhaust emissions at all combinations of engine speed, vehicle speed and engine load.
8. W hen the engine is under a light load, the VTC control actuator (located inside the intake cam timing chain sprocket) is at its base position. The angle of the intake cam lobes is retarded to reduce the entry of exhaust gases into the intake ports and to achieve stable fuel consumption during lean burn.
9. When the engine is under a medium- to-high load, the VTC control actuator is at its advance control position. Cam angle is advanced slightly to reduce the effect of a diluted charge when the EGR system is operating by reducing the accompanying pumping loss. The intake valve is closed quickly to help reduce the entry of air/fuel mixture into the intake port and to improve the charging effect.
10. When the engine is operating at higher speeds, the VTC control actuator is at its advance-base position. The cam phase angle is controlled for maximum valve timing and maximum engine power.
Component replacement Civic 1.8L engines
Rocker arm oil control valve and oil pressure sensor
11. Remove the cowl cover.
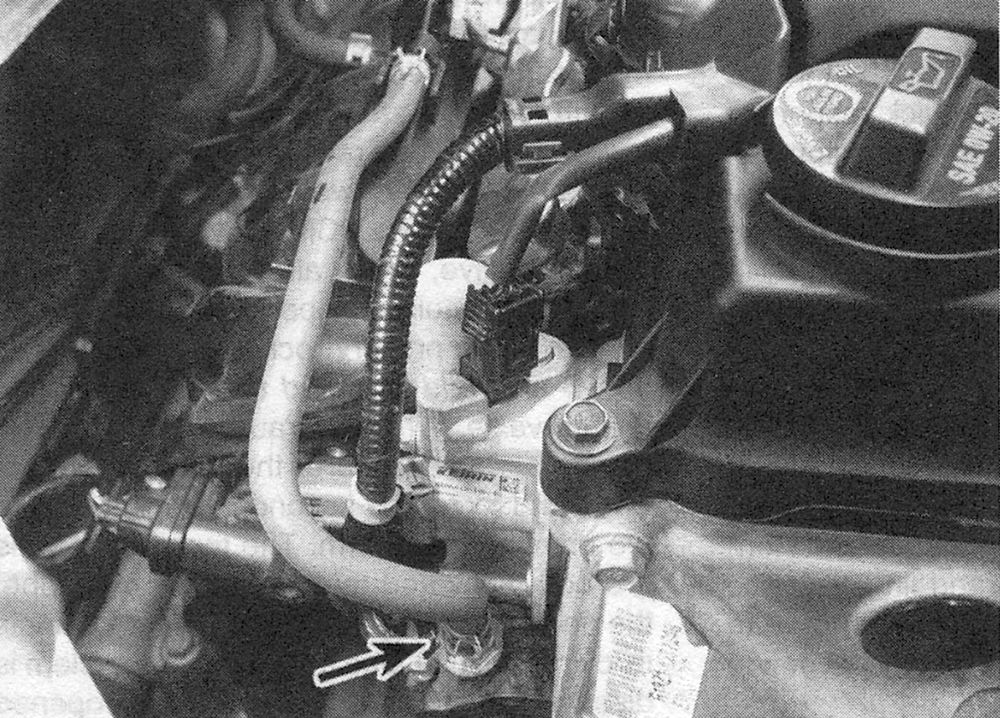
12. Disconnect the electrical connector from the rocker arm oil control valve (see illustration).
i.12 Typical 1.8L rocker arm oil control valve details
A Rocker arm oil control valve electrical connector
B Rocker arm oil pressure sensor
13. Remove the rocker arm oil control valve mounting bolts and remove the valve from the cylinder head. Inspect the filter for clogging and, if necessary, clean it with fresh solvent. If the filter is too dirty to be cleaned, replace it, and replace the engine oil and the engine oil filter.
14. Remove the two-control valve mounting bolts and separate the control valve from the housing.
15. Remove the old 0-ring between the solenoid and the valve and discard it. Always install a new 0-ring when you disassemble the solenoid and the valve.
16. Using a new 0-ring, install the valve.
17. The oil pressure sensor screws into the side of the oil control valve housing. To replace the sensor, unscrew it and use a new copper washer when installing.
18. Installation is otherwise the reverse of removal. Be sure to tighten the solenoid to valve bolts and the rocker arm oil control valve mounting bolts securely.
CR-V and Civic 2.4L engines VTEC solenoid valve and oil pressure sensor
19. Locate the VTEC solenoid valve at the right rear corner of the cylinder head and disconnect the electrical connector.
20. Remove the VTEC solenoid valve mounting bolts, remove the solenoid valve heat shield and remove the VTEC solenoid from the cylinder head.
21. Remove the VTEC solenoid valve filter. Inspect the filter for clogging and, if necessary, clean it with fresh solvent. If the filter is too dirty to be cleaned, replace it, and replace the engine oil and the engine oil filter (see Tune-up and routine maintenance).
22. Remove the solenoid-to-valve mounting bolts and separate the solenoid from the valve. Depress the plunger into the valve with your finger. It should move freely in its bore in the valve. If it doesn’t, replace the VTEC solenod valve.
23. The oil pressure sensor screws into the top of the oil control valve housing. To replace the sensor, unscrew it and use a new copper washer when installing.
24. Installation is the reverse of removal. Be sure to tighten the VTEC solenoid valve mounting bolts securely.
VTC oil control solenoid valve
25. Locate the VTC oil control solenoid valve on the right end of the cylinder head.
26. Disconnect the electrical connector from the VTC oil control solenoid valve.
Note: If necessary, remove the ground cable from the motor mount for additional access.
27. Remove the VTC oil control solenoid mounting bolt and remove the solenoid valve.
28. Remove and discard the old VTC oil control solenoid valve 0-ring.
29. Inspect the VTC oil control solenoid valve for clogging. If the oil control solenoid valve is clogged, replace it and inspect the VTC oil strainer.
30. Using a new 0-ring, install the VTC oil control solenoid valve, tighten the mounting bolt securely and plug in the electrical connector.
VTC oil strainer
31. Locate the VTC oil control solenoid oil strainer on the right front corner of the cylinder head (the exhaust side). 32 Remove the VTC oil strainer cover bolts and remove the cover.
33. Remove the VTC oil strainer and inspect it for clogging. If the strainer is clogged, clean it in fresh solvent. If the strainer is too dirty to clean, replace it, then replace the engine oil and the oil filter (see Tune-up and routine maintenance).
34. Installation is the reverse of removal. Be sure to tighten the VTC oil strainer cover bolts securely.