Cooling system servicing (draining, flushing and refilling)
Warning: Do not allow antifreeze to come in contact with your skin or painted surfaces of the vehicle. Rinse off spills immediately with plenty of water. Antifreeze is highly toxic if in¬gested. Never leave antifreeze lying around in an open container or in puddles on the floor; children and pets are attracted by its sweet smell and may drink it. Check with local au¬thorities about disposing of used antifreeze. Many communities have collection centers which will see that antifreeze is disposed of safely. Never dump used antifreeze on the ground or pour it into drains.
1. Periodically, the cooling system should be drained, flushed and refilled to replenish the antifreeze mixture and prevent formation of rust and corrosion, which can impair the performance of the cooling system and cause engine damage. When the cooling system is serviced, all hoses and the radiator cap should be checked and replaced if necessary.
Draining
Warning: If the vehicle has just been driven, wait several hours to allow the engine to cool down before beginning this procedure.
2. Apply the parking brake and block the rear wheels, then raise the front of the vehicle and support it securely on jack stands. Turn the heater control to maximum heat.
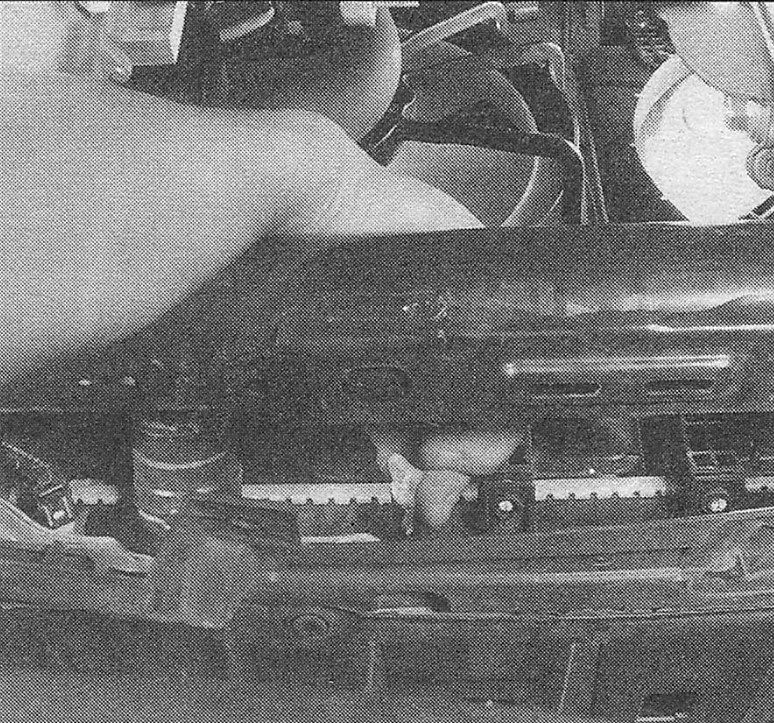
3. Remove the center portion of the under-vehicle splash shield (see illustration 6.7). Move a large container under the radiator drain to catch the coolant, then open the drain fitting until coolant starts flowing from the drain hole (a pair of pliers may be required to turn it) (see illustration).
i.3 Location of the radiator drain fitting- before opening the valve, push a short length of rubber hose onto the plastic fitting to prevent the coolant from splashing
Note: Not all radiators are equipped with a plastic fitting that will accommodate a hose.
4. Remove the radiator cap and allow the radiator to drain, then move the container under the engine. If you’re working on an SOHC engine, loosen the engine block drain plug and allow the coolant in the block to drain (see illustration).
i.4 On SOHC engines, unscrew the engine block drain plug (located on the front side of the block, in front of cylinder no. 4)

5. While the coolant is draining, check the condition of the radiator hoses, heater hoses and clamps.
6. Replace any damaged clamps or hoses. Close the drain fitting and, if removed, install and tighten the block drain plug to the torque listed in this Chapter’s Specifications.
Flushing
7. Fill the cooling system with clean water, following the Refilling procedure (see Step 13).
8. Start the engine and allow it to reach normal operating temperature, then rev up the engine a few times.
9. Turn the engine off and allow it to cool completely, then drain the system as described earlier.
10. Repeat Steps 7 through 9 until the water being drained is free of contaminants.
11. In severe cases of contamination or clogging of the radiator, remove the radiator (see Cooling, heating and air conditioning systems) and have a radiator repair facility clean and repair it if necessary.
12. Many deposits can be removed by the chemical action of a cleaner available at auto parts stores. Follow the procedure outlined in the manufacturer’s instructions.
Note: When the coolant is regularly drained and the system refilled with the correct anti- freeze/water mixture, there should be no need to use chemical cleaners or descales.
Refilling
13. Fill the cooling system with the proper type and mixture of antifreeze (see this Chapter’s Specifications), up to the base of the radiator cap filler neck. Loosely install the radiator cap.
14. Start the engine and run it at approximately 1500 rpm until the radiator fan comes on two times. Feel the upper radiator hose — it should be warm, indicating the thermostat has opened.
15. Turn off the engine and let it cool down. Slowly remove the radiator cap and check the coolant level, adding as necessary.
Warning: If you hear a hissing sound as you unscrew the cap, STOP Let the engine cool down longer. Fill the coolant reservoir up to the MIN mark, if necessary.
16. Start the engine, allow it to reach normal operating temperature once again and check for leaks.